
Overview
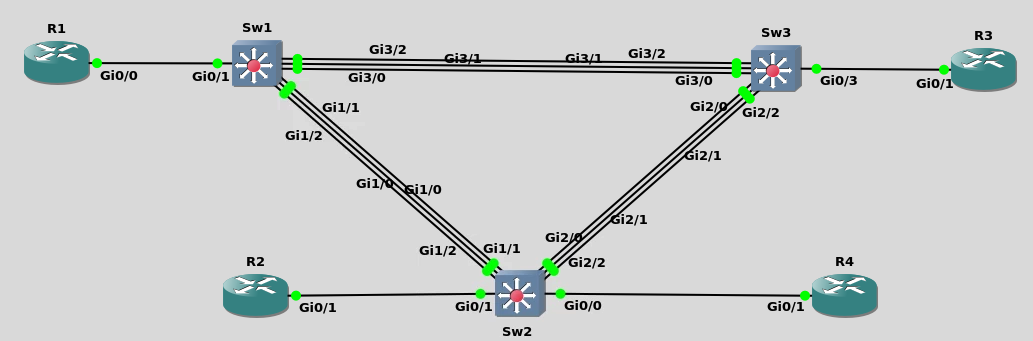
Helpful Hints about INE’s virtual lab environment:
- Save your configuration changes frequently in the event that you get locked out of a device or lose connectivity
- If you are suddenly logged out of the GNS3 lab environment and log back in again, you may see the prompt, “Another GNS3 instance is running, continue? (Y/N)”. Select “Yes”
-
If you ever lose console access to one (or more) of your devices you will need to reboot the Ubuntu Virtual Machine that is hosting your GNS3 lab environment. To do this,
- Minimize your GNS3 window
- Open the “Terminal” app within the Ubuntu device
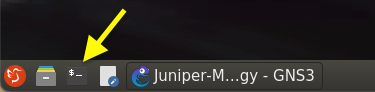
- Type “reboot” within the Terminal window
- Wait 20-30 seconds and then click the “Reconnect” option to log back in.
Task: Initial Configuration
-
Login to all three switches (right-click on the switch within the topology diagram and select the "Console" option) and change from "User EXEC" mode into "Privileged EXEC" mode.
-
Configure a unique hostname on each switch. You may use whatever hostname you wish.
-
Login to Switch-1 and shutdown interfaces GigabitEthernet1/0 through 1/2.
-
Configure IP addresses on all switch management interfaces as follows:
- Sw1 : 10.1.1.1/24 (i.e. 10.1.1.1 255.255.255.0)
- Sw2 : 10.1.1.2/24 (i.e. 10.1.1.2 255.255.255.0)
- Sw3 : 10.1.1.3/24 (i.e. 10.1.1.3 255.255.255.0)
-
Configure a default-gateway of 10.1.1.10 on all switches. No device actually exists in your topology with this IP address but you should know how to configure the command.
-
Configure Sw1 as a telnet server (i.e. capable of responding to incoming Telnet requests on any of its VTY lines) using the password cisco.
-
Configure an enable password of "cisco" on Sw1 and then save all of your configuration changes from its Running-Config file to its Starting-Config file.
-
Login to Switch-2 and from User EXEC mode (or Privileged EXEC mode...it doesn't matter) you should be able to telnet to Sw1.
Solutions:
-
To move from User EXEC to Privileged EXEC mode one issues the "enable" command:
Switch> Switch>enable Switch# -
To configure a unique hostname within a switch (or router) one must first enter "Global Configuration Mode" by typing "configure terminal" (or "conf t") and then entering the command, "hostname" followed by a space and then your descriptive name for the device. When you are finished entering configuration commands you leave Global Configuration Mode by entering the "end" command.
Switch#configure terminal Switch(config)#hostname Switch-1 Switch(config)#end -
One can apply configuration commands to individual interfaces on a switch or a range of interfaces. In this step it would have been easiest to implement the "interface range" command to allow you to shutdown multiple interfaces at once as follows:
Switch-1#configure terminal Switch-1(config)#interface range GigabitEthernet1/0 - 1/2 Switch-1(config-if-range)#shutdown Switch-1(config-if-range)#end -
By default, Cisco switches have VLAN 1 as their management VLAN. We can assign an IP address in the VLAN 1 interface, which can be used to access that particular switch via remote access tools such as Telnet, SSH, etc.
Historically, early Cisco switches were only Layer-2 devices, which (just like a laptop or PC) needed to be configured with a default-gateway using the "ip default-gateway" command to make them accessible from different networks. Unlike a Layer 3 device, a Layer-2 switch cannot route the packets because it only works based on the destination mac address. In today's modern networks most switches are "Multilayer Switches" which means that (like routers) they can run routing protocols and route packets. But for this introductory lab, we'll treat these three switches as if they did not have that capability and were Layer-2 only.
Sw1:
            enable
            !
            configure terminal
            !
            interface vlan 1
             ip address 10.1.1.1 255.255.255.0
             no shutdown
             end
Sw2:
            enable
            !
            configure terminal
            !
            interface vlan 1
             ip address 10.1.1.2 255.255.255.0
             no shutdown
             end
Sw3:
            enble
            !
            configure terminal
            !
            interface vlan 1
             ip address 10.1.1.3 255.255.255.0
             no shutdown
             end
-
To configure a default-gateway in each switch follow this pattern:
            Sw1:
            enable
            !
            configure terminal
            !
            ip default-gateway 10.1.1.10
            end
-
Now configure Sw1 as the telnet server. Notice the command below of "transport input telnet". Some IOS devices default to allowing incoming sessions of both Telnet and SSH. Other IOS devices have a default behavior of not allowing any kind of incoming session. Because you may not know (from device to device) what its default behavior is, this particular command explicitly tells the device to listen to, and respond to, incoming Telnet requests.
Sw1: enable ! configure terminal ! line vty 0 4 transport input telnet password cisco ! enable password cisco -
To configure an Enable password (which will display in cleartext in the output of your configuration file) and then save your configuration changes do the following:
Sw1: enable ! configure terminal ! enable password cisco endcopy running-config startup-config (One could also use the command, "write mem")
Verification
Initially, we can check for the IP addressing and reachability information between all the switches in this topology. When it is successful, we can check for the telnet session to Sw1 from Sw2 (and even Sw3 if you wish). We can use some kind of output modifier to get clean output, as shown here.
            Sw1#show ip interface brief | exclude unassigned
            Interface              IP-Address      OK? Method Status                Protocol
            Vlan1                  10.1.1.1        YES manual up                    up

            Sw1#ping 10.1.1.2

            Type escape sequence to abort.
            Sending 5, 100-byte ICMP Echos to 10.1.1.2, timeout is 2 seconds:
            .!!!!
            Success rate is 80 percent (4/5), round-trip min/avg/max = 1/2/8 ms

            Sw1#ping 10.1.1.3

            Type escape sequence to abort.
            Sending 5, 100-byte ICMP Echos to 10.1.1.3, timeout is 2 seconds:
            .!!!!
            Success rate is 80 percent (4/5), round-trip min/avg/max = 1/3/9 ms


            Sw2#show ip interface brief | exclude unassigned
            Interface              IP-Address      OK? Method Status                Protocol
            Vlan1                  10.1.1.2        YES manual up                    up

            Sw2#ping 10.1.1.1

            Type escape sequence to abort.
            Sending 5, 100-byte ICMP Echos to 10.1.1.1, timeout is 2 seconds:
            !!!!!
            Success rate is 100 percent (5/5), round-trip min/avg/max = 1/2/4 ms

            Sw2#ping 10.1.1.3

            Type escape sequence to abort.
            Sending 5, 100-byte ICMP Echos to 10.1.1.3, timeout is 2 seconds:
            .!!!!
            Success rate is 80 percent (4/5), round-trip min/avg/max = 1/3/4 ms


            Sw3#show ip interface brief | exclude unassigned
            Interface              IP-Address      OK? Method Status                Protocol
            Vlan1                  10.1.1.3        YES manual up                    up

            Sw3#ping 10.1.1.1

            Type escape sequence to abort.
            Sending 5, 100-byte ICMP Echos to 10.1.1.1, timeout is 2 seconds:
            !!!!!
            Success rate is 100 percent (5/5), round-trip min/avg/max = 1/2/4 ms

            Sw3#ping 10.1.1.2

            Type escape sequence to abort.
            Sending 5, 100-byte ICMP Echos to 10.1.1.2, timeout is 2 seconds:
            !!!!!
            Success rate is 100 percent (5/5), round-trip min/avg/max = 4/4/4 ms
To validate Telnet simply login to Switch-2 and issue the command, "Telnet 10.1.1.1". This will cause Switch-2 to initiate a TCP session with Switch-1 using a destination TCP port of 23 (for Telnet). Because you enabled the Telnet protocol on Switch-1 you should be prompted for a password (which is "cisco"). Type in that password and the device prompt should now validate that you are within Switch-1's IOS CLI.