
Description
Docker is an open platform for developing, shipping, and running applications. Docker enables you to separate your applications from your infrastructure so you can deliver software quickly. With Docker, you can manage your infrastructure in the same ways you organize your applications. By taking advantage of Docker’s methodologies for shipping, testing, and deploying code quickly, you can significantly reduce the delay between writing code and running it in production.
Source: https://docs.docker.com/
Lab Environment
In this lab environment, the user will access a Kali GUI instance. Also, GUI access to Ubuntu 20.04 is provided to you. It can be accessed using the tools installed on Kali at http://demo.ine.local. The Ubuntu machine is running a misconfigured Docker application.
Your task is to find possible misconfigurations in Docker and fix them by making changes on the target machine, then check the behavior and verify.
Objective: Find the misconfigurations in Docker on the target machine and fix them.
Below are the tasks that you need to perform and secure Docker:
- Task 1: Restrict running Privileged Container
- Task 2: Set Filesystem and Volumes to Read-only
- Task 3: Restrict System Calls from Within Containers
- Task 4: Segregate Container Networks
- Task 5: Limit Container Resources like RAM and CPU
- Task 6: Secure Exposed Docker Daemon Socket

Tools
The best tools for this lab are:
- Nmap
- Curl
- A web browser
- jq
- Docker CLI / Docker Daemon
Please go ahead ONLY if you have COMPLETED the lab or you are stuck! Checking the solutions before actually trying the concepts and techniques you studied in the course will dramatically reduce the benefits of a hands-on lab!
Solution
Step 1: Open the lab link to access the Kali and Ubuntu machines.
Kali Machine
Ubuntu Machine
Step 2: Check if the provided target machine is reachable.
Command
ping -c3 demo.ine.local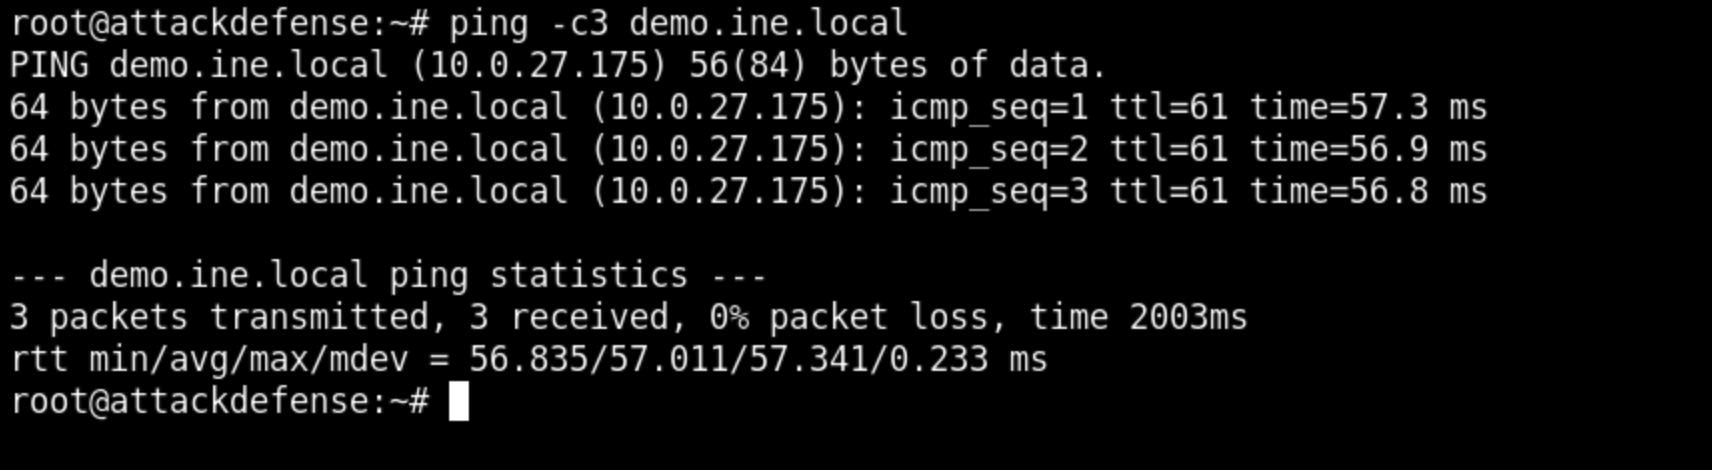
The target machine is reachable. 10.0.27.175 is the IP address of the target machine.
Step 3: Check if the Default Docker port is open on the target machine.
Command:
nmap -p2375 demo.ine.local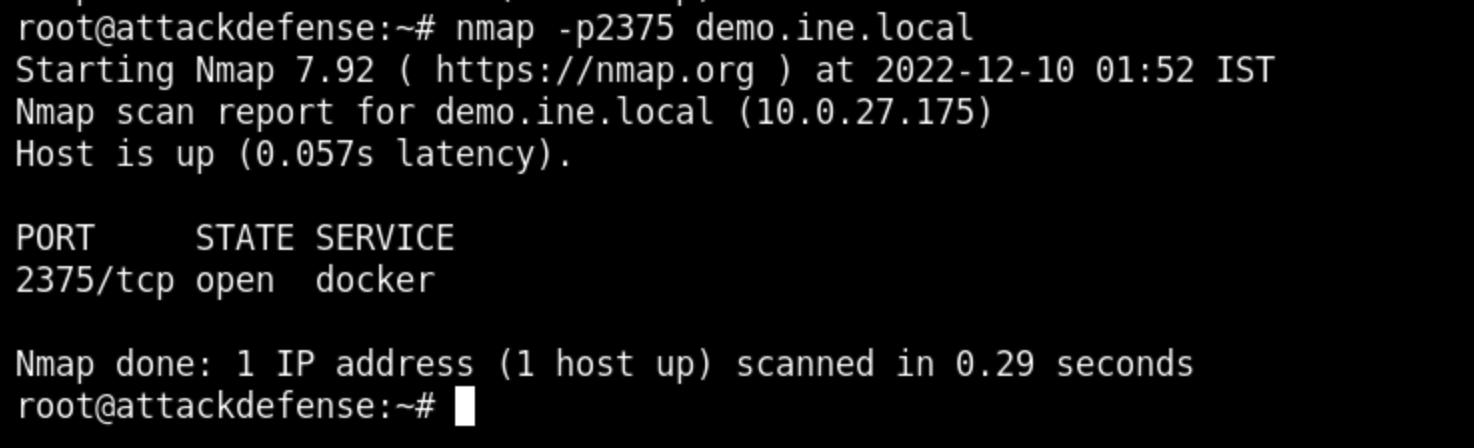
Docker is running on port 2375 on the target machine.
Go to the target machine to perform the below tasks.
Task 1: Restrict running Privileged Container
For this, we need to check container prodpriv.
Step 4: Check docker privileges using Docker inspect.
Command:
docker inspect prodpriv | grep Privileged
Here, you can verify that the container has the privileged flag set to true. Running privileged containers in Docker can introduce security risks and vulnerabilities, as containers with escalated privileges have access to sensitive system resources and can potentially be used to compromise the host system.
Stop the container prodpriv to make changes.
Command:
docker stop prodpriv
To avoid running privileged containers in Docker, you can use the following steps:
Step 5: Changing container privilege
Command:
docker run --privileged=false --name prodpriv -d -it prodpriv
The "--privileged" flag allows a container to have access to all of the host system's resources, including the network and file system. This flag should only be used when necessary and should be carefully controlled and monitored to prevent unauthorized access and misuse.
Step 6: Validate the changes
Now, to validate the changes, re-run the inspect command and look for variable privileges.
Command:
docker inspect prodpriv | grep Privileged
We have successfully revoked the privileges of the container prodpriv.
Task 2: Set Filesystem and Volumes to Read-only
Source: https://blog.container-solutions.com/understanding-volumes-docker
For this, we need to check container filesys.
Docker allows you to set the filesystem and volumes of a container to be read-only, which can help to prevent unauthorized modifications and protect the integrity of the container's data and configuration.
Step 7: Check all the existing volumes
Command:
docker volume ls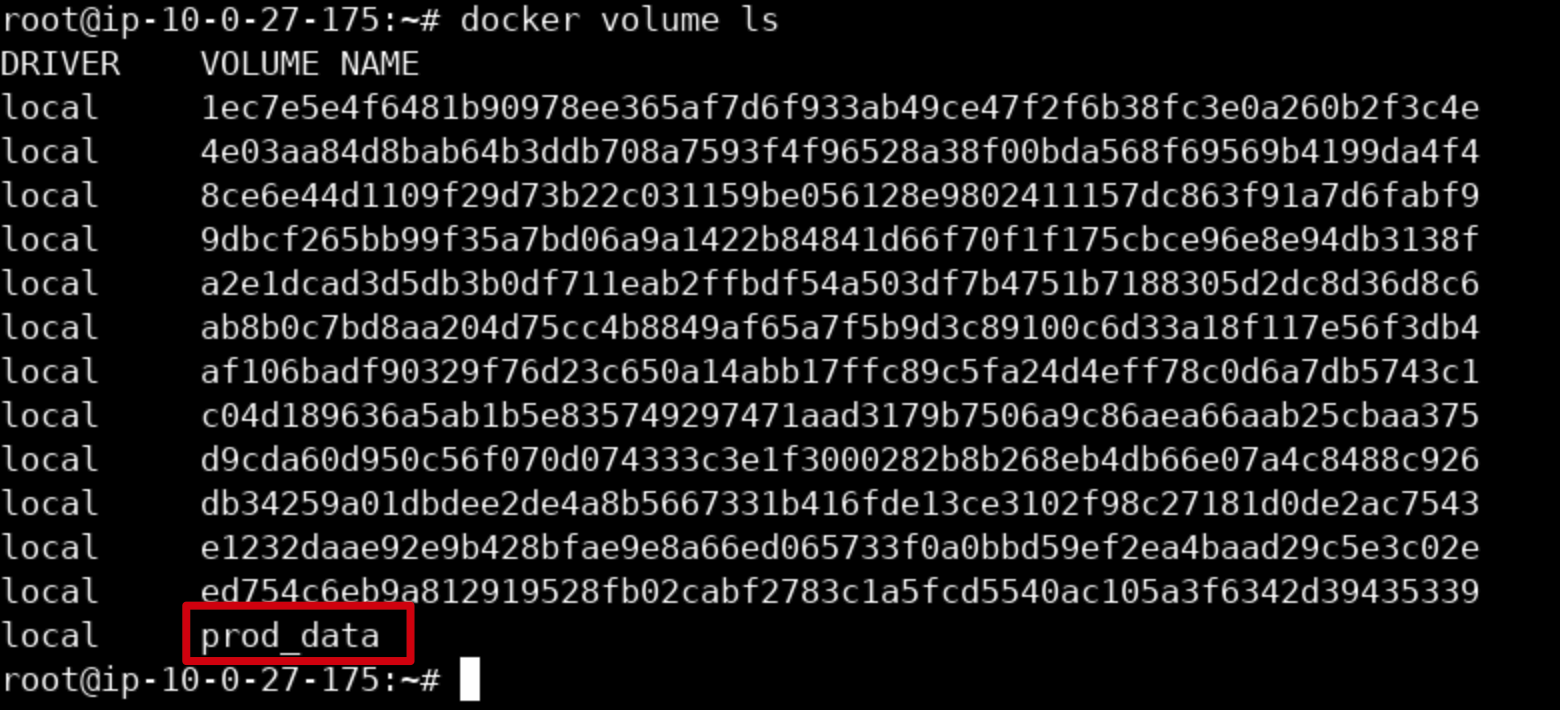
Step 8: List out containers running volume prod_data
Command:
docker ps -a --filter volume=prod_data
Here, we can verify that the filesys container has access to volume prod_data.
Step 9: Check the destination of the mounted filesystem or volume
Command:
docker inspect filesys | grep prod_data
The location to which the volume prod_data is mounted is /opt/data path in the filesys container.
Step 10: Open a bash session in the filesys container
Command:
docker exec -it filesys bash
Step 11: Open the path to which the volume is mounted
Command:
cd /opt/data
Step 12: Create some file in the folder to check if we have access to it or not
Command:
touch 1 2 3 4 5
    ls
The container filesys has read-write permission.
Now, exit using the container using the exit command.
Step 13: Make the changes to the filesystem and volume to give read-only permission
First, we will stop the running filesys container.
Command:
docker stop filesys
Step 14: Re-run the container in read-only mode and verify
Command:
docker run --rm -ti --name filesys --volume prod_data:/opt/data:ro filesys
Overall, setting the filesystem and volumes of a Docker container to be read-only can help to prevent unauthorized modifications and protect the integrity of the container's data and configuration.
Step 15 : Validate the changes
Go to the mounted volume path and try to write some files into it
Command:
cd /opt/data
    rm -rf wp-admin/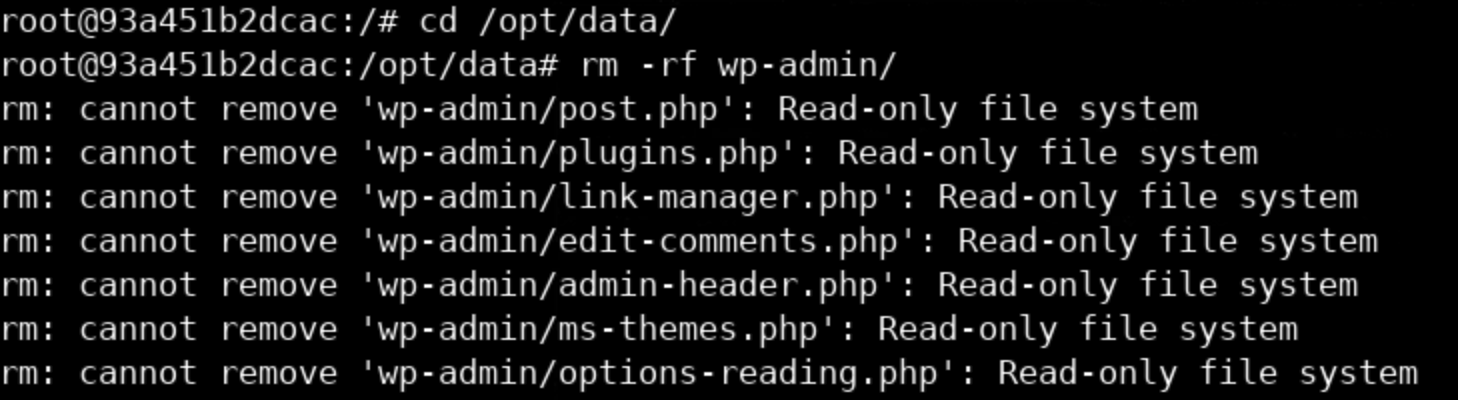
Container filesys is restricted to read-only filesystems and volumes. So, we can no longer change its data or configuration. Any attempts to write to the filesystem or volumes within the container will fail.
Now, exit using the container using the exit command.
Task 3: Restrict System Calls from Within Containers
For this, we need to check container public which is running a public container having no restriction on a system call.
Step 16: Open a bash session in the public container
Command:
docker exec -it public bash
Step 17: Check if mkdir syscall is working
Command:
mkdir test
Now, exit using the container using the exit command.
Stop the running public container from making changes and secure the misconfiguration.
Command:
docker stop public
Step 18: Create a file profile.json in /home/ubuntu/ directory to allow/block the syscalls using seccomp
Source: https://tbhaxor.com/basics-of-seccomp-for-dockers/
Secure computing mode (seccomp) is a Linux kernel feature. You can use it to restrict the actions available within the container. The seccomp() system call operates on the seccomp state of the calling process. You can use this feature to restrict your application’s access.
Add the following to the profile.json
{
      "defaultAction": "SCMP_ACT_ALLOW",
      "syscalls": [
        {
          "name": "mkdir",
          "action": "SCMP_ACT_ERRNO"
        },
            {
          "names": [
                  "socket",
                    "connect"
          ],
          "action": "SCMP_ACT_ERRNO"
        }
      ]
    }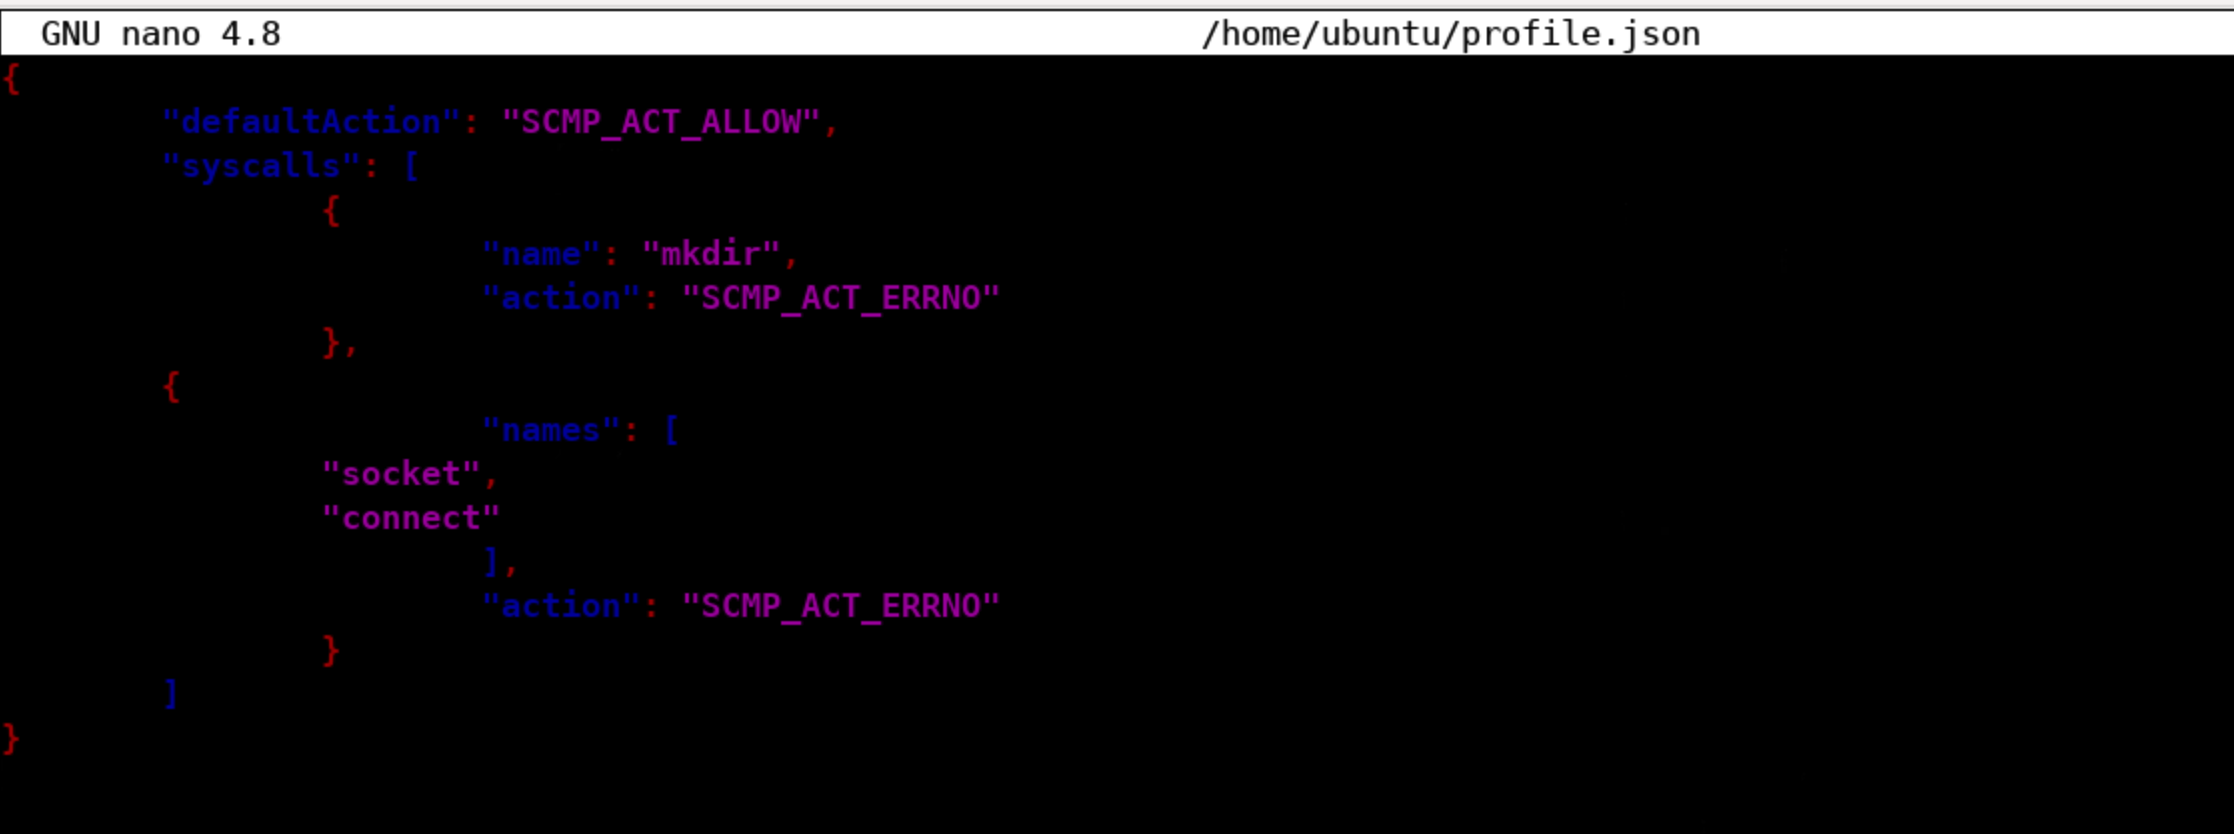
The default seccomp profile provides a sane default for running containers with seccomp and disables around 44 system calls out of 300+.
Step 19: Initiate a container with --security-opt option to block syscalls mentioned in the profile.json
Run this command to restrict syscalls on the container and check if the mkdir syscall is restricted or not
Command:
docker run --rm -it --security-opt seccomp:/home/ubuntu/profile.json public bash -c "mkdir test"
The seccomp syscalls restriction is enabled now.
Note: When you run a container, it uses the default profile unless you override it with the --security-opt option.
Now, exit the container using the exit command.
Many times restricting the syscalls helps prevent privilege escalation.
Task 4: Segregate Container Networks
Source: https://tjtelan.com/blog/how-to-link-multiple-docker-compose-via-network/
For this, we need to check two containers, web and database, which run under a common network profile called Bridge.
By default, the network used in the docker within the container is bridged so any user can connect to any of the running containers within the network.
Step 20: Inspect docker network Bridge Profile
Commands:
docker network inspect bridge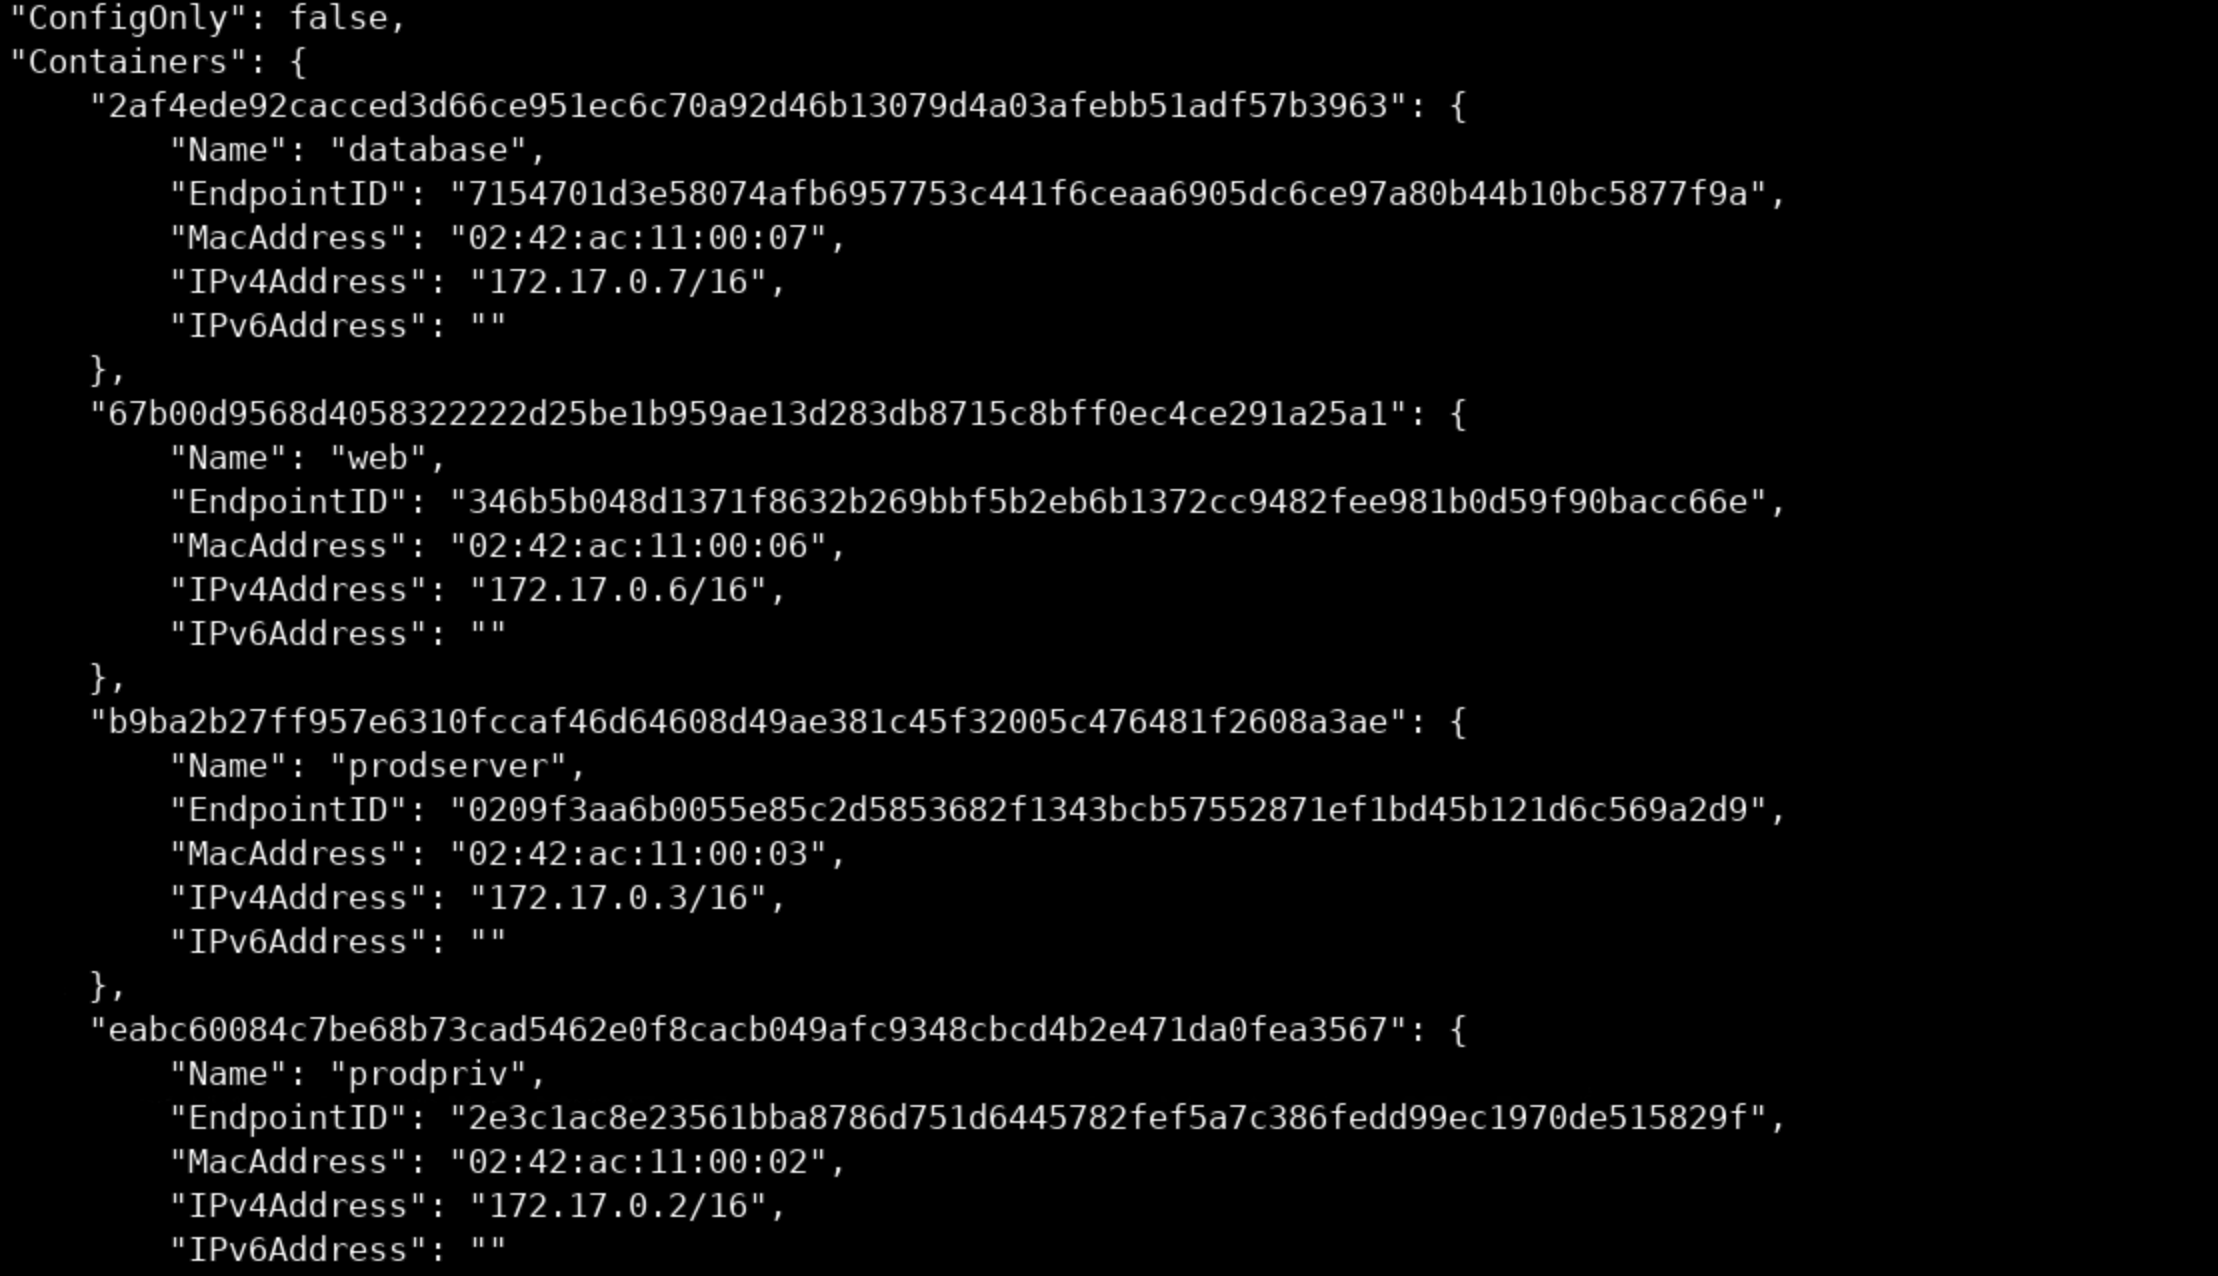
As you can see, all containers are bridged together in the same network, which is not a good practice.
Step 21: Stop the web and database containers.
Commands:
docker stop web database
Step 22: Create a docker-compose file with a having the two containers running on a different network profile
Create a docker-compose.yaml file and add the following.
Add the following to docker-compose.yaml
version: '3'
    services:
      mariadb:
        image: mariadb
        volumes:
          - ./data:/var/lib/mysql
        environment:
          MYSQL_ROOT_PASSWORD: abc_123321
        networks:
          - isolated_network
        container_name: database
      httpd:
        image: httpd
        ports:
          - "80:80"
        networks:
          - isolated_network
        container_name: web
    networks:
      isolated_network:
        driver: bridge
        ipam:
          driver: default
          config:
            - subnet: 172.20.0.0/24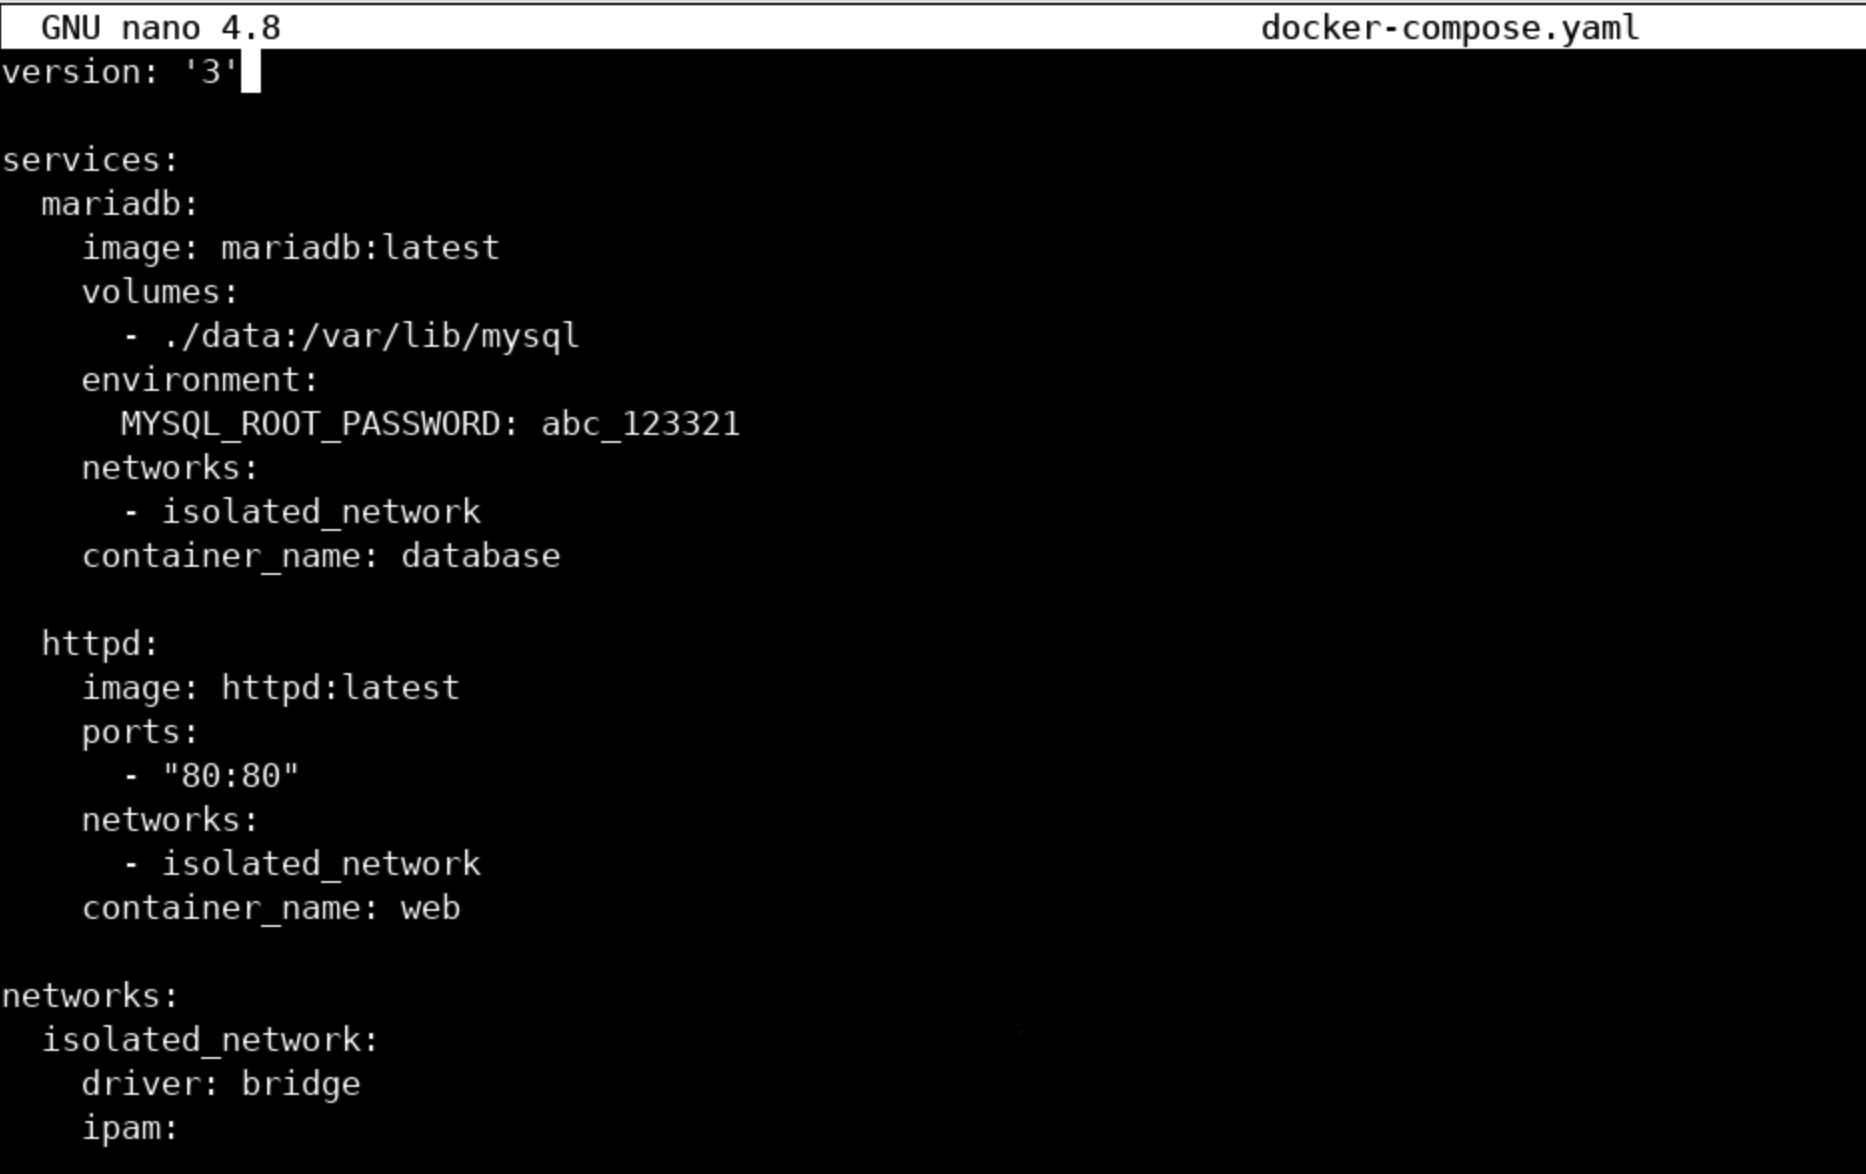
This docker-compose.yml file will run two containers, one based on the MariaDB and the httpd Docker image. The MariaDB container will be named database, it will be configured to persist its data in a volume at ./data on the host file system, and it will be connected to the isolated network. The Apache HTTP Server container will be named web, it will be connected to the same network and will be exposed on port 80 on the host.
Change the subnet that you want to use for the isolated network. When you run docker-compose up, this configuration will start the two containers and connect them to the isolated network. The MariaDB container will be named database and will be isolated from other networks.
Step 23: Build the containers using docker-compose up
The following command will take the docker-compose.yml file in your local directory and start building the containers.
Commands:
docker-compose up 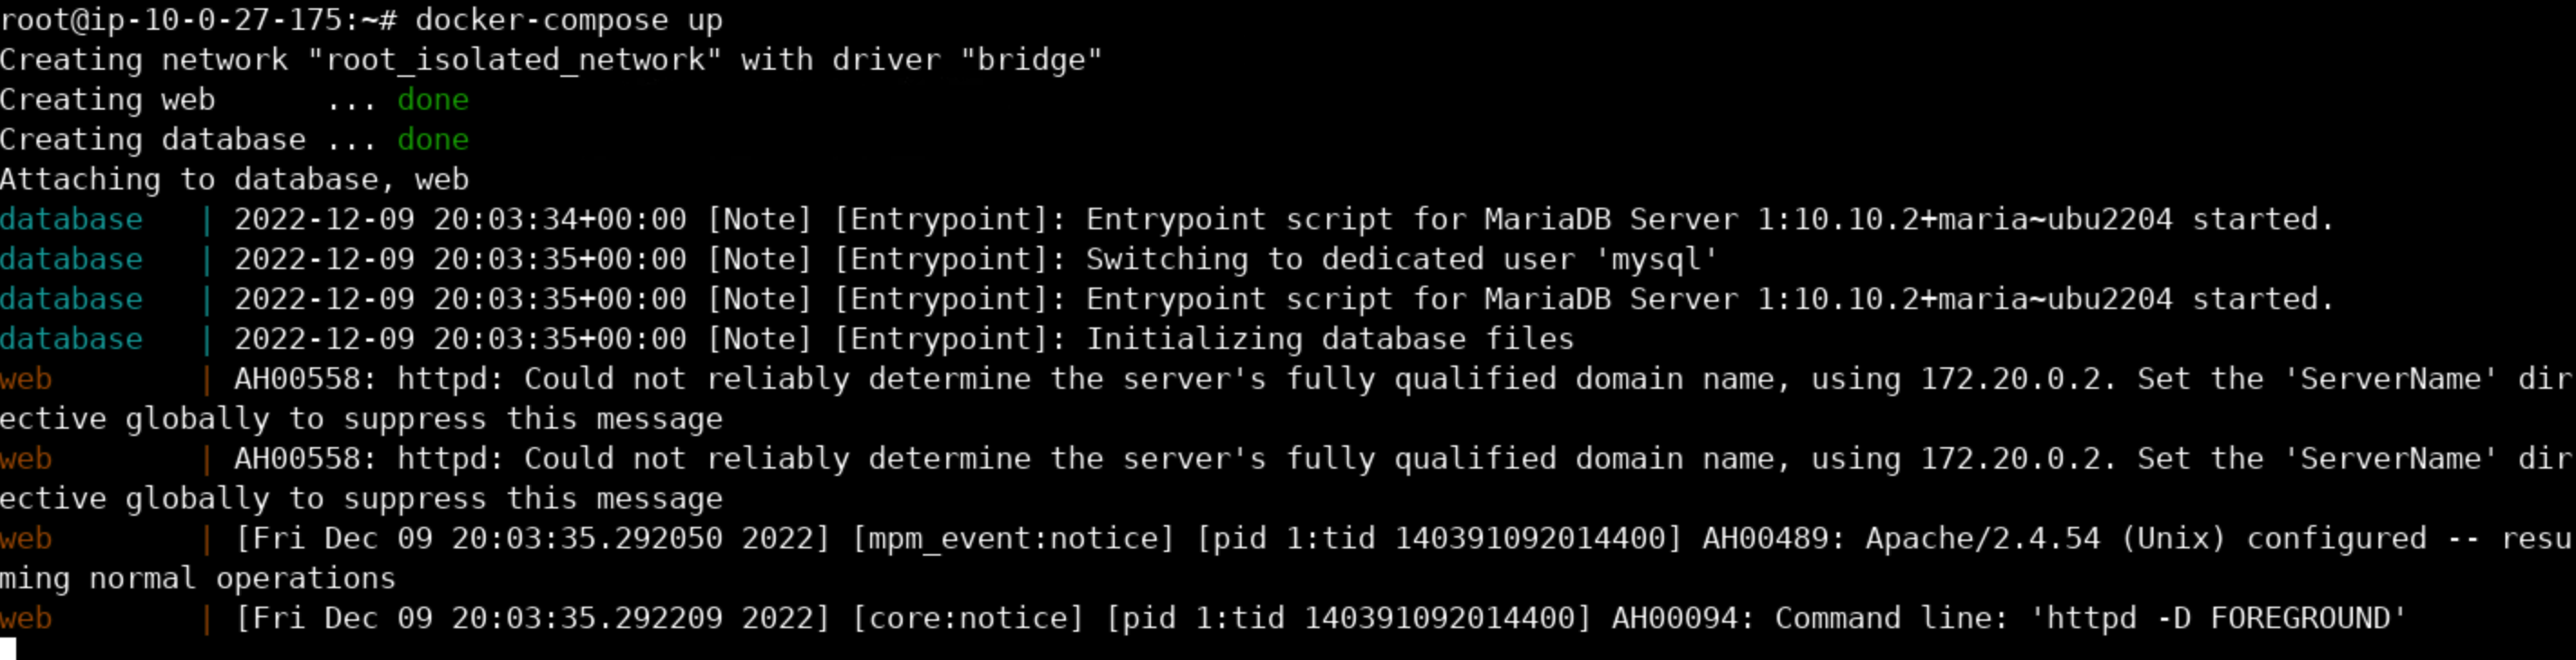
Our build is complete; the new containers should be running now.
Step 24: Check the network profiles
Commands:
docker network ls 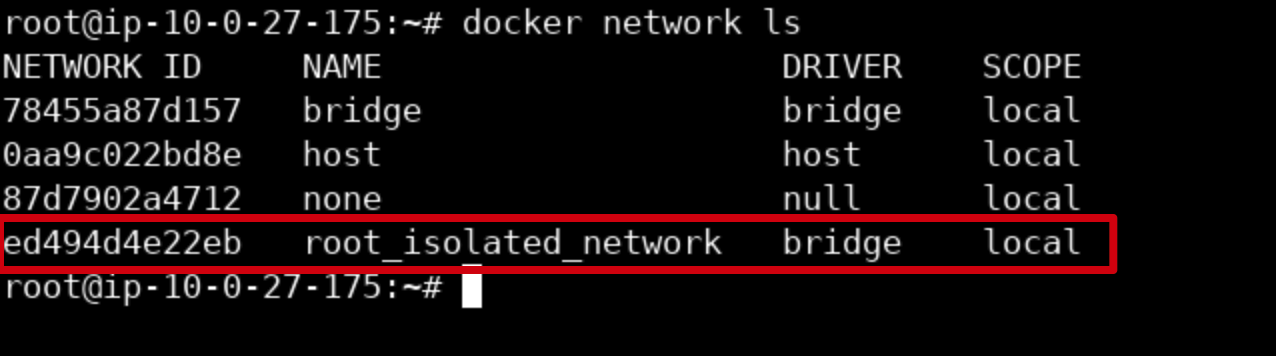
Step 25: Inspect Docker Bridge Network Profile
Commands:
docker network inspect bridge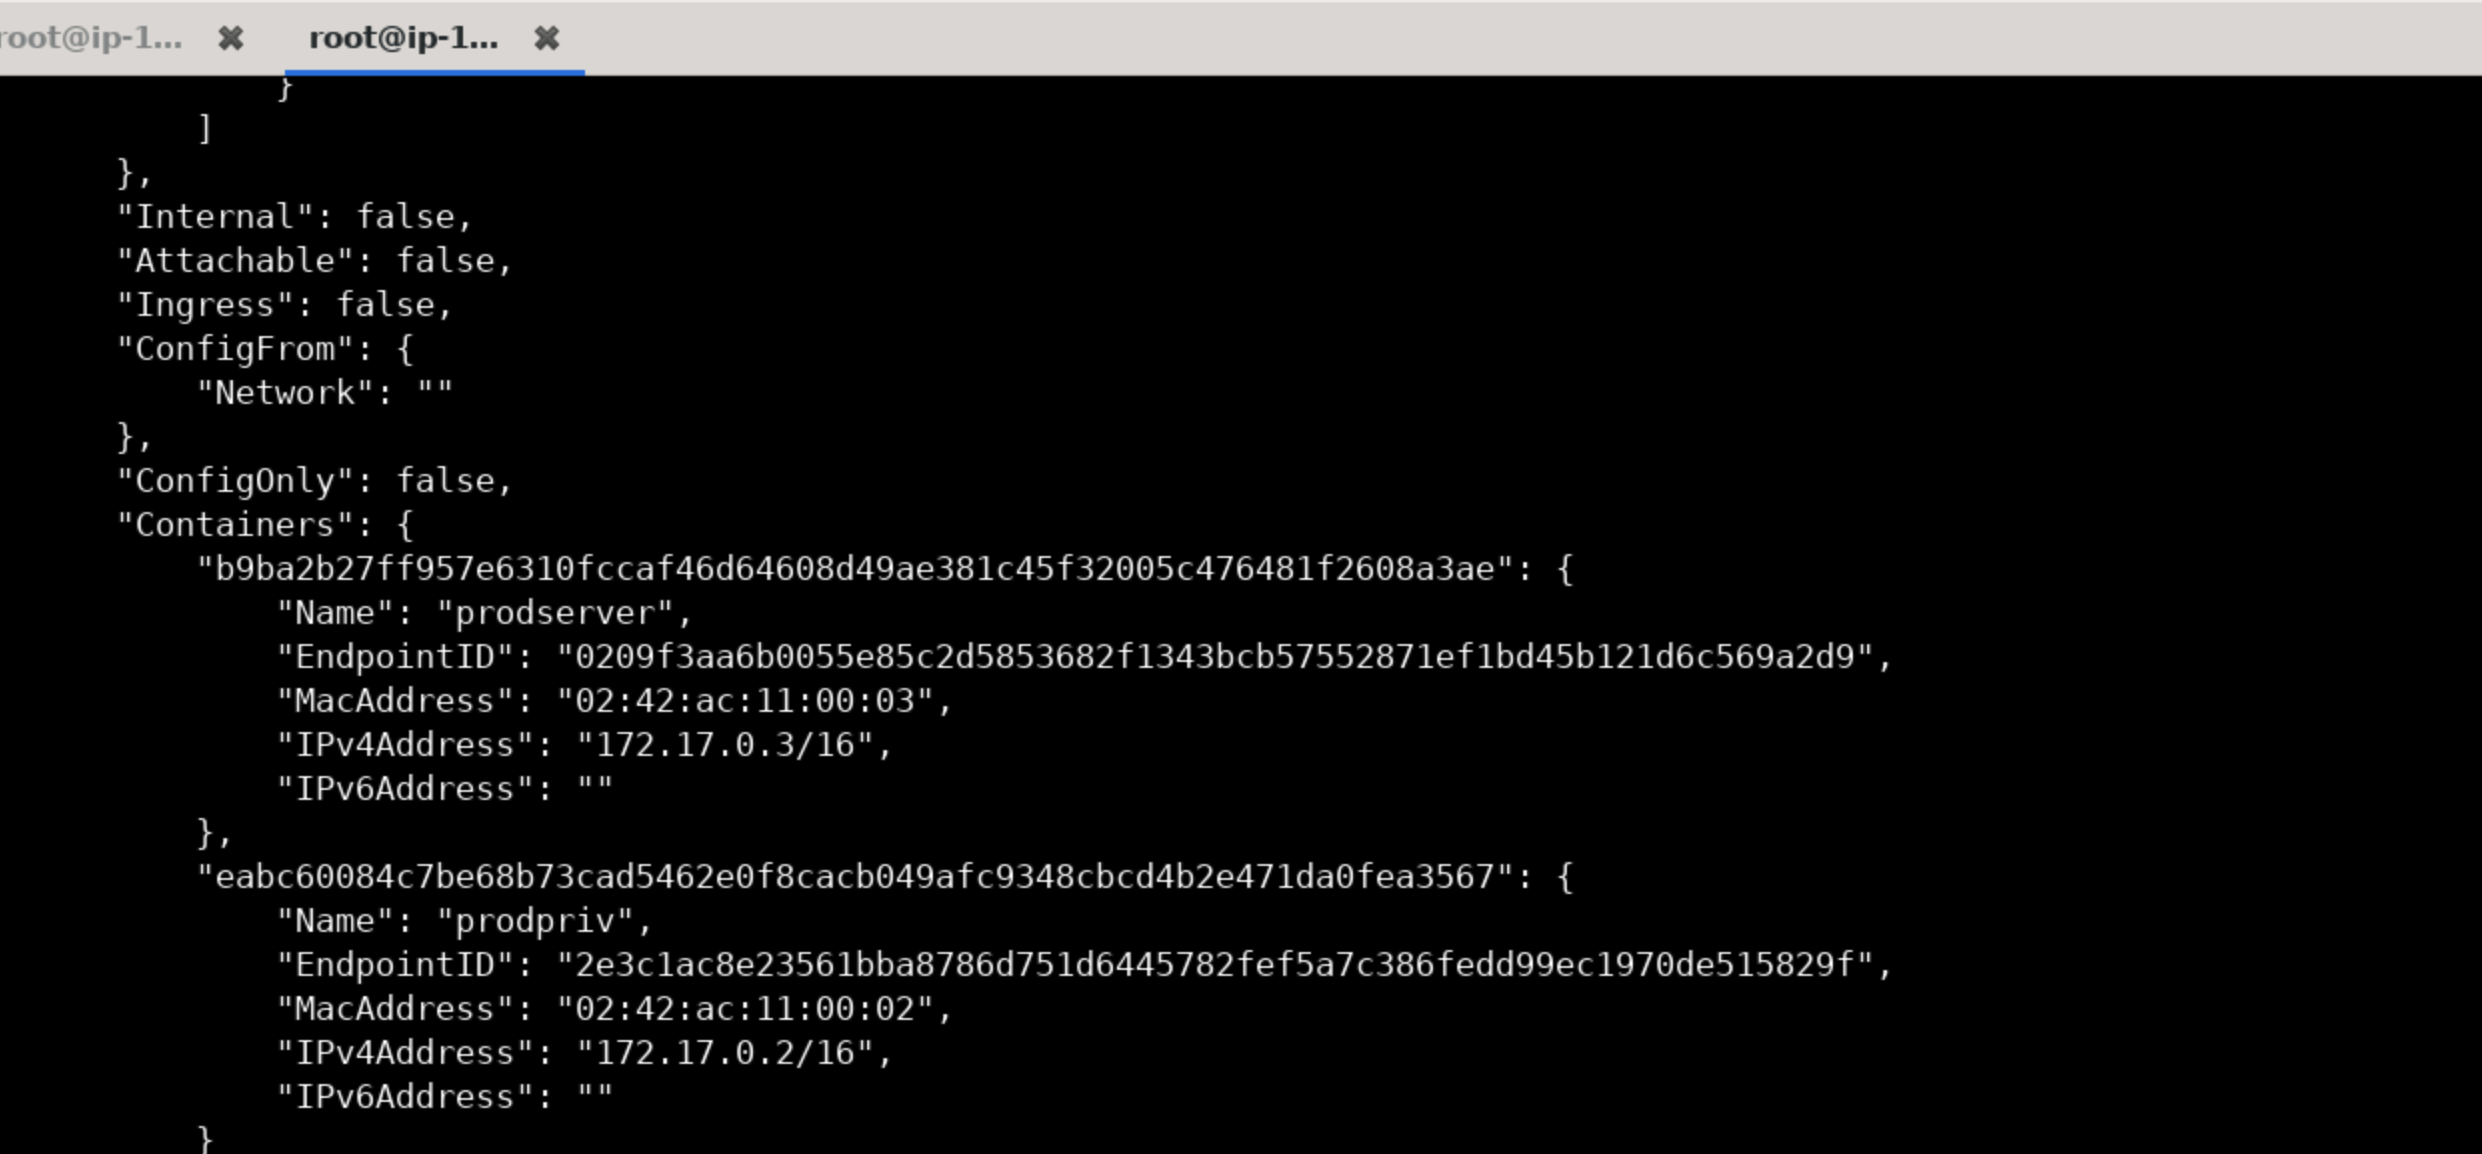
As you can see, the two containers web and database are no longer in the bridge network profile.
Step 26: Inspect Docker Isolated Network
Commands:
docker network inspect root_isolated_network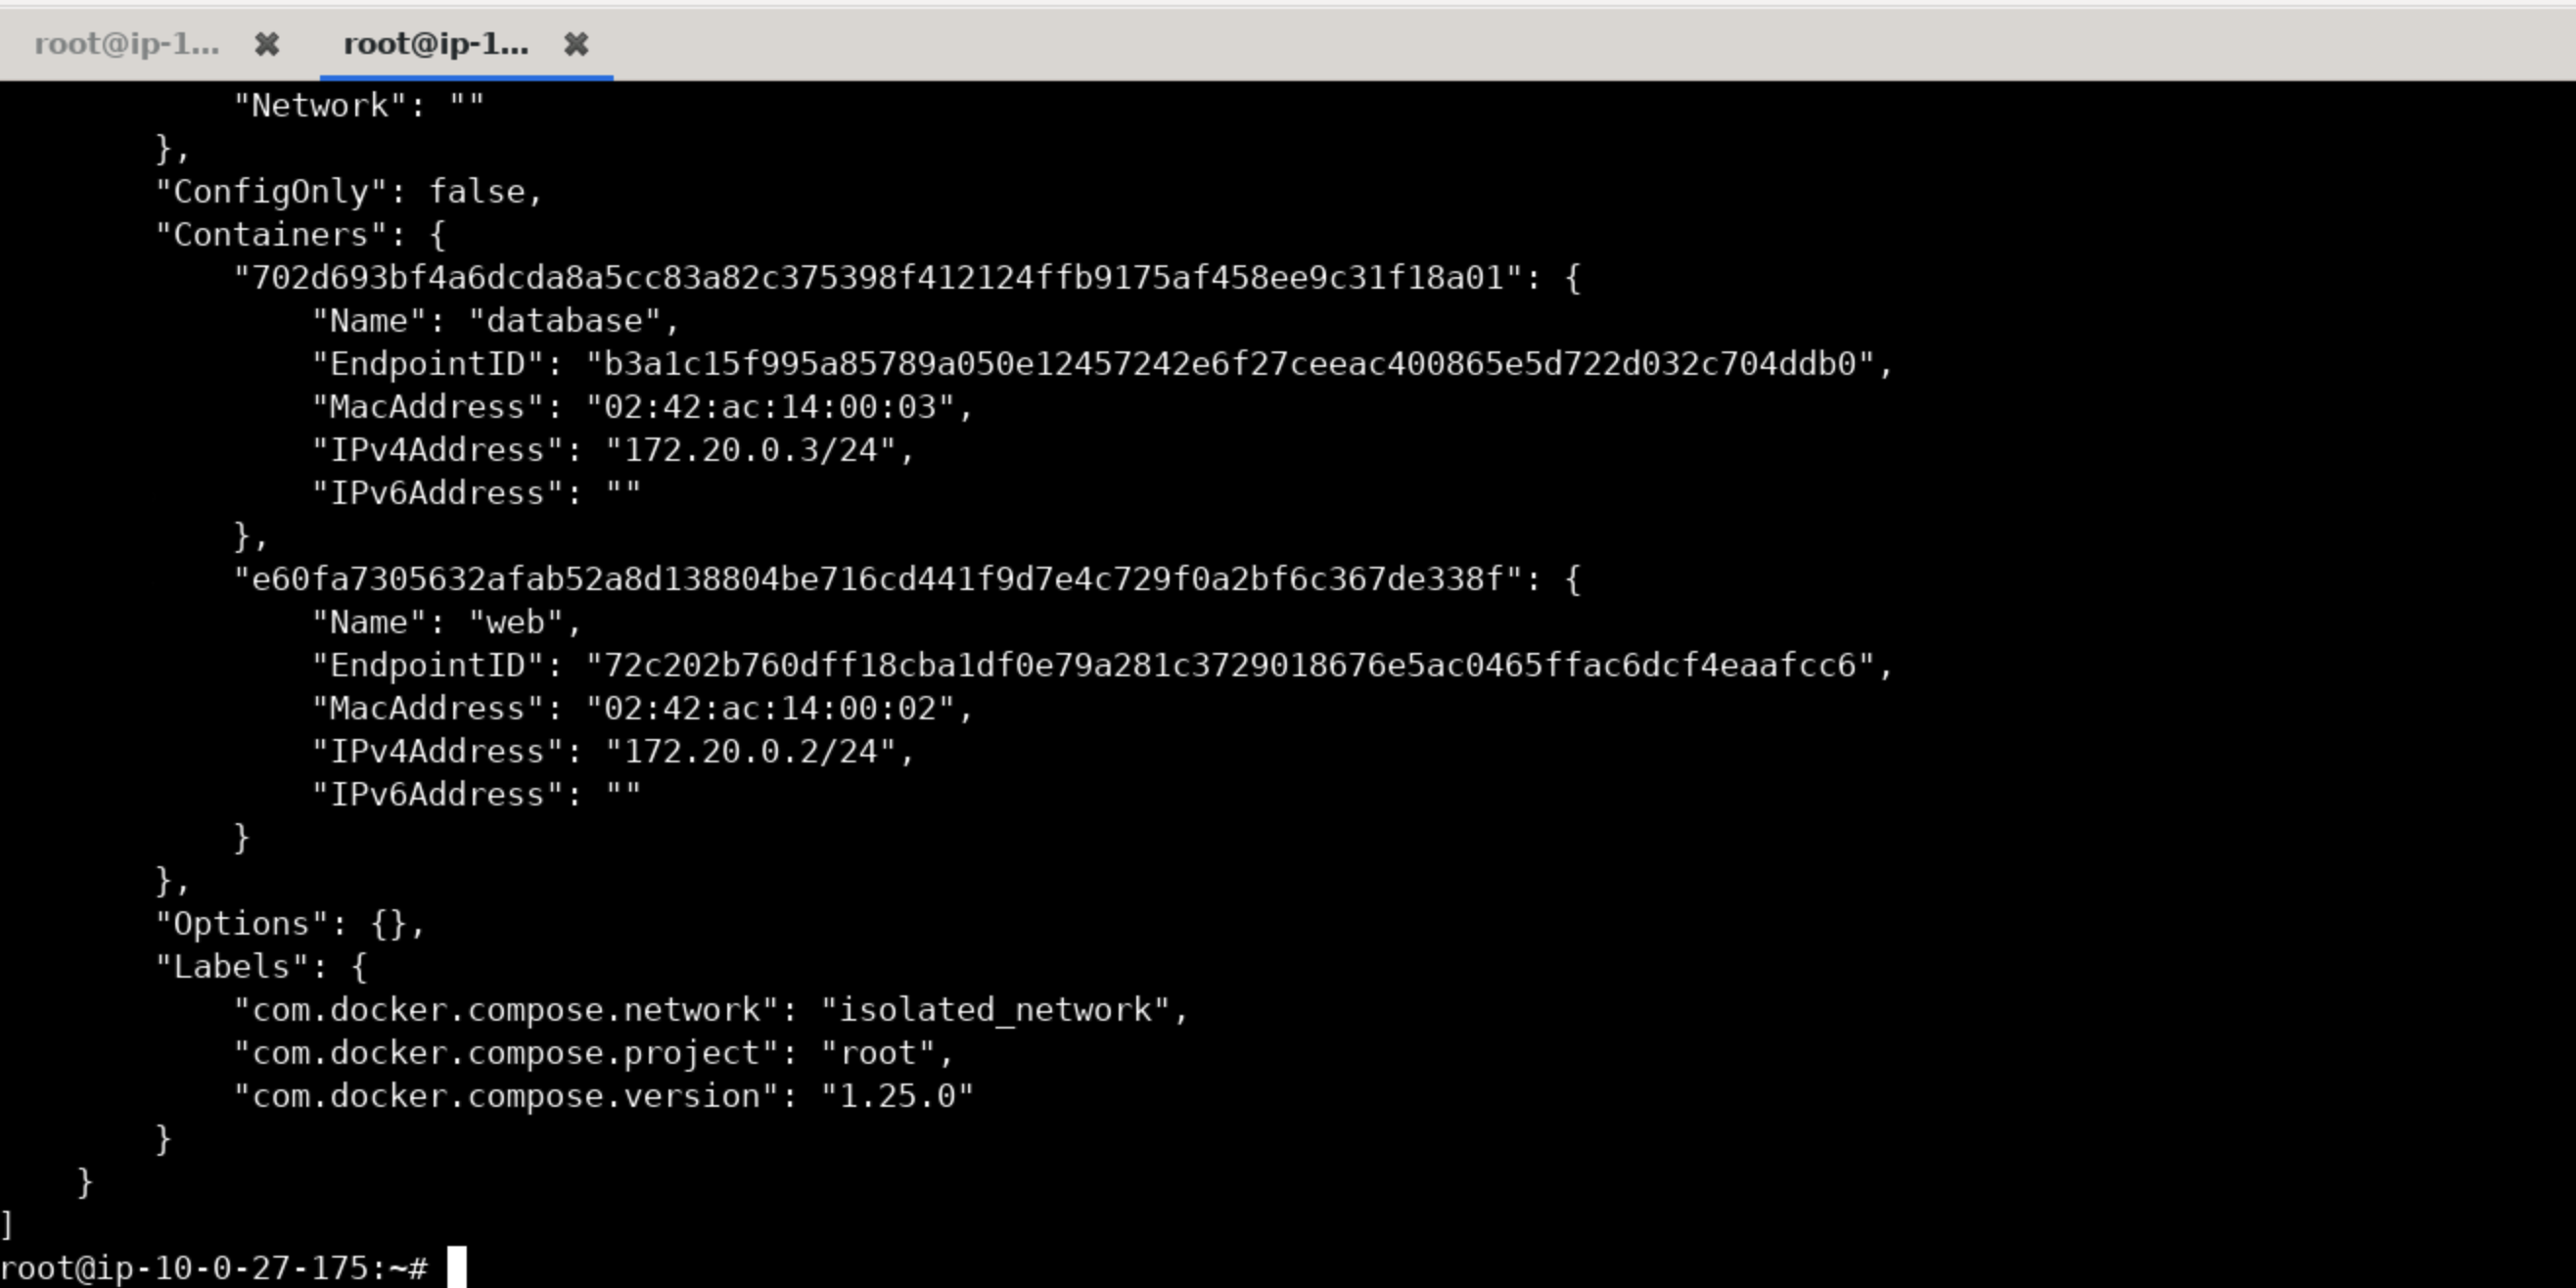
We can verify containers web and database are connected to the same network in isolation from other networks.
Task 5: Limit Container Resources like RAM and CPU
Source: https://gupta-bless.medium.com/securing-docker-with-these-best-practices-48cdcdc0728e
Step 27: Running Docker Stats
To check if a Docker container is running with the RAM and CPU limits that you have set, you can use the docker stats command. This command will show you real-time resource usage statistics for all running containers on the host.
Check Ram Status
Commands:
docker stats prodserver
Check CPU Shares
Commands:
docker inspect prodserver | grep CpuShares
Stop the prodserver containers.
Commands:
docker stop prodserver
Step 29: Limit container resources using --cpu-shares and --memory options
Commands:
docker run --memory 1024m --cpu-shares 512 -it -d --name prodserver prodserver
This will run the container with a memory limit of 1024 MB, and a CPU limit of half a core. Keep in mind that limiting a container's resources can affect its performance, so it's essential to set appropriate boundaries for the workloads you are running in the container.
Step 30: Validate the changes
Check the resource usage statistics again.
Commands:
docker stats prodserver
    docker inspect prodserver | grep CpuShares

Hence, we can verify that the container has a memory limit of 1024 MB and CPU share has a limit of 512.
Task 6: Secure Exposed Docker Daemon Socket
Step 31: List all running processes on the system and look for the dockerd
Commands:
ps aux | grep dockerd
Step 32: Check if Docker Daemon is exposed using netstat with -plunt option
Commands:
netstat -plunt | grep dockerd
We know that the docker daemon socket is exposed to all external networks or untrusted users.
Step 33: Retrieving list of Docker Images using curl.
Let's try to retrieve the list of Docker images on the host from the Docker daemon API at http://0.0.0.0:2375/images/json. This API endpoint returns the list of Docker images in JSON format. JQ is used to parse and beautify the JSON.
Commands:
curl -S http://0.0.0.0:2375/images/json | jq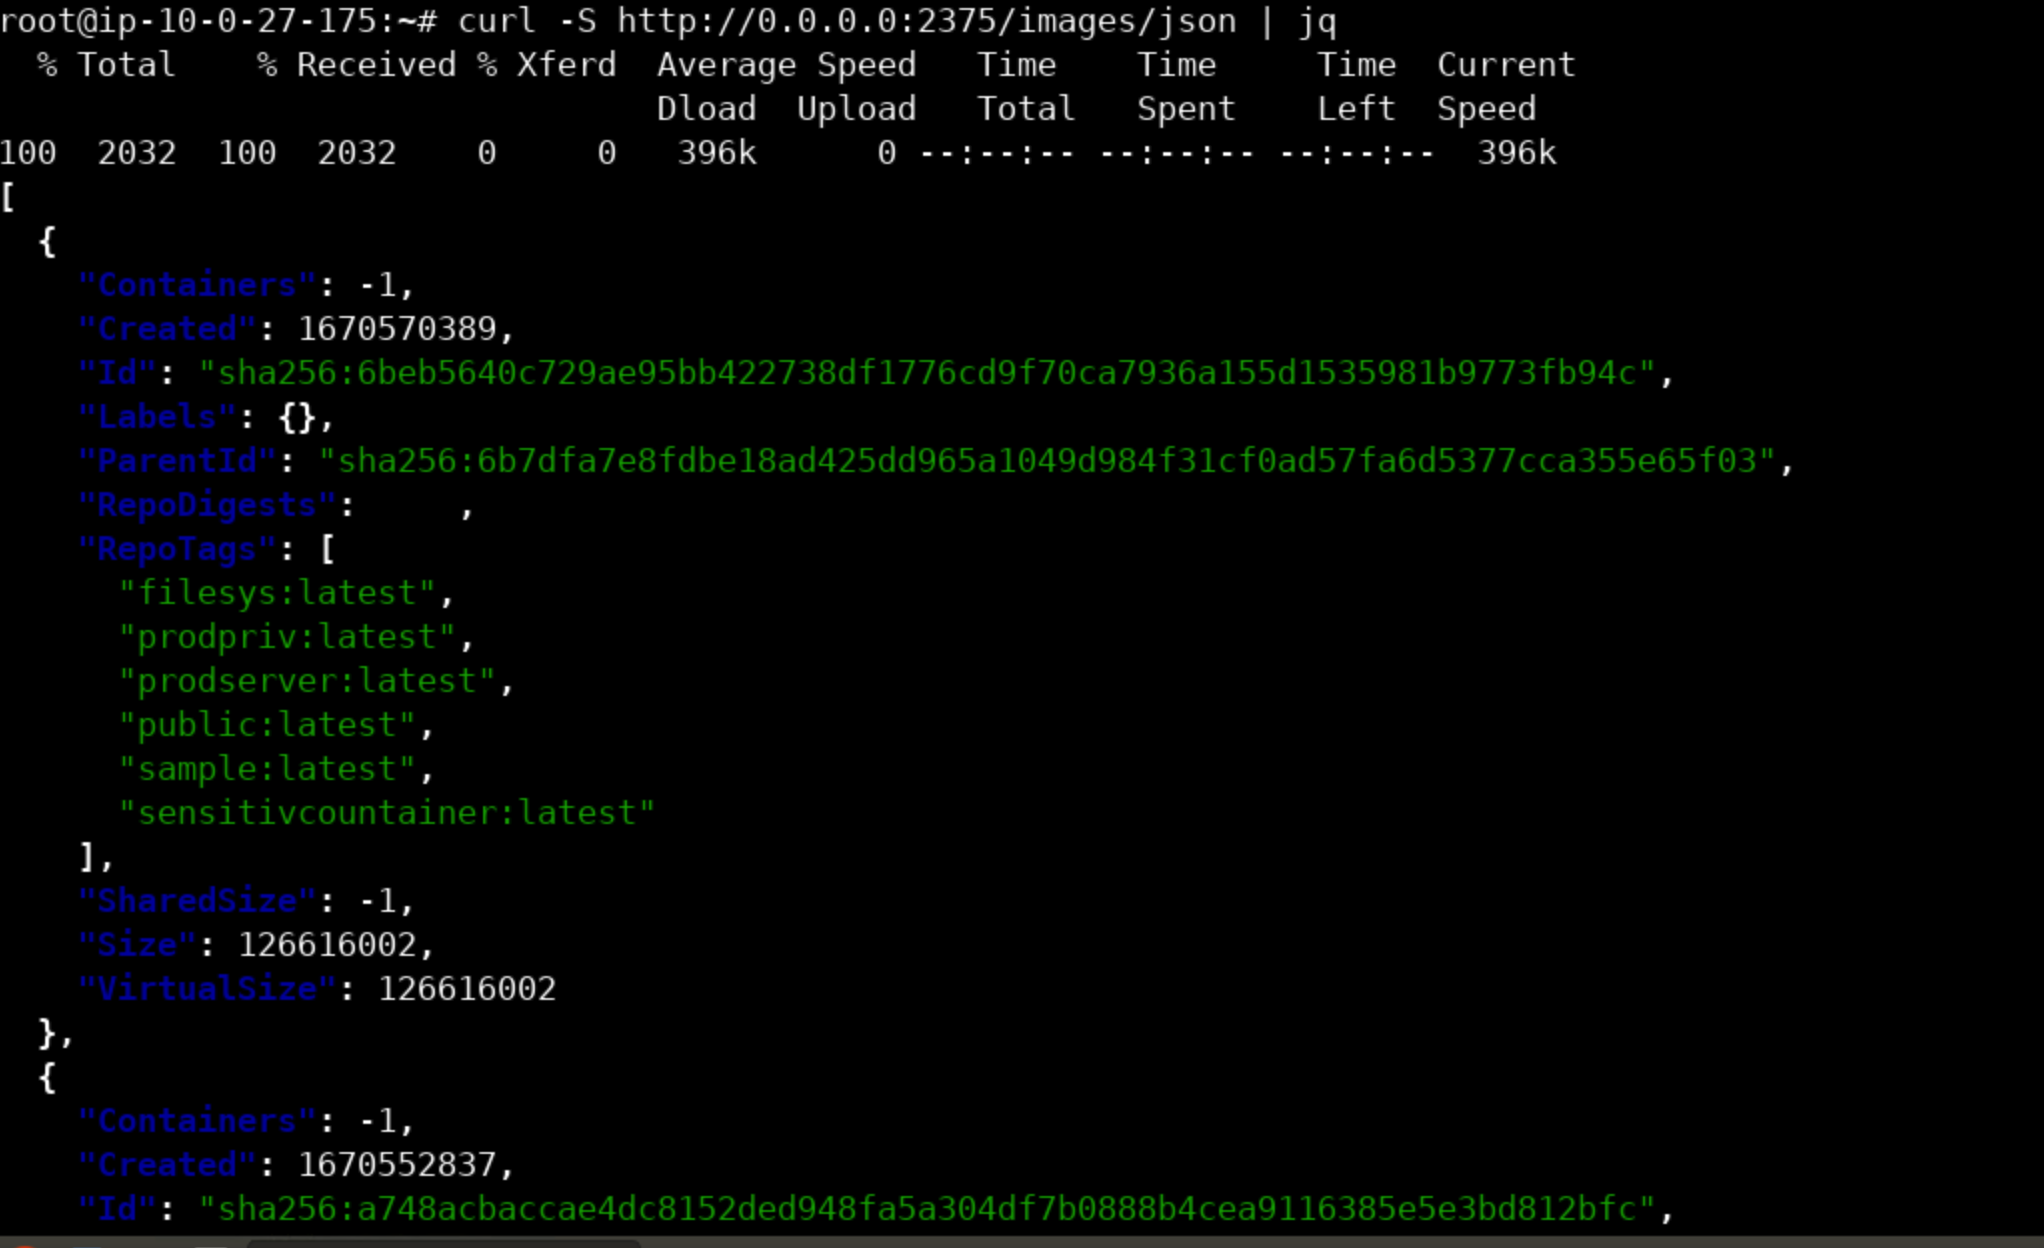
Here, the daemon socket is exposed to all external networks. Let's try to fetch these docker images/container information using the attacker's machine.
Go to Attacker's Machine.
Fetch docker images information
Commands:
curl -S http://demo.ine.local:2375/images/json | jq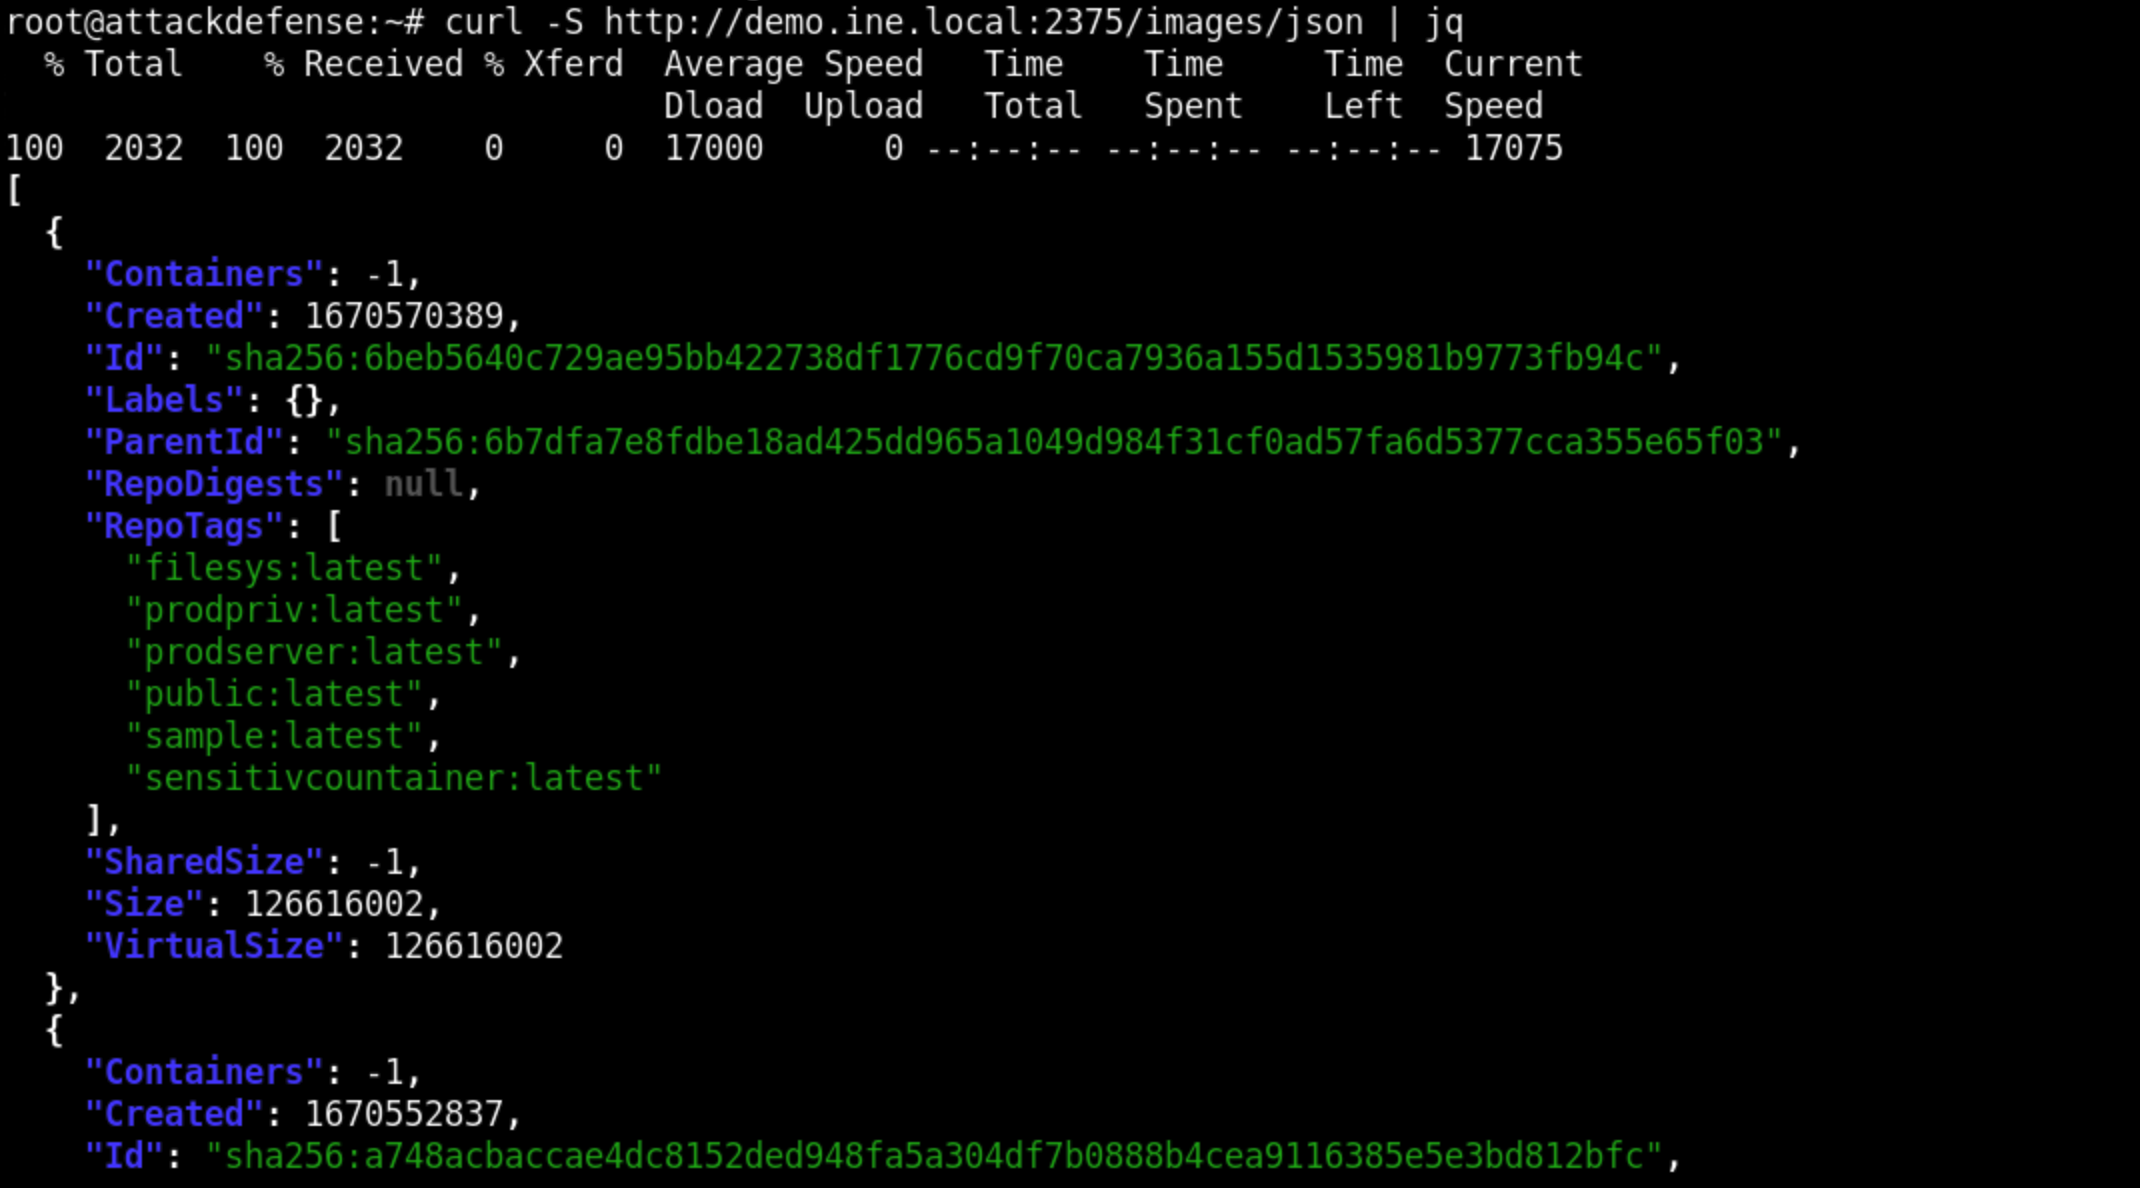
Fetch docker containers information
Commands:
curl -S http://demo.ine.local:2375/containers/json | jq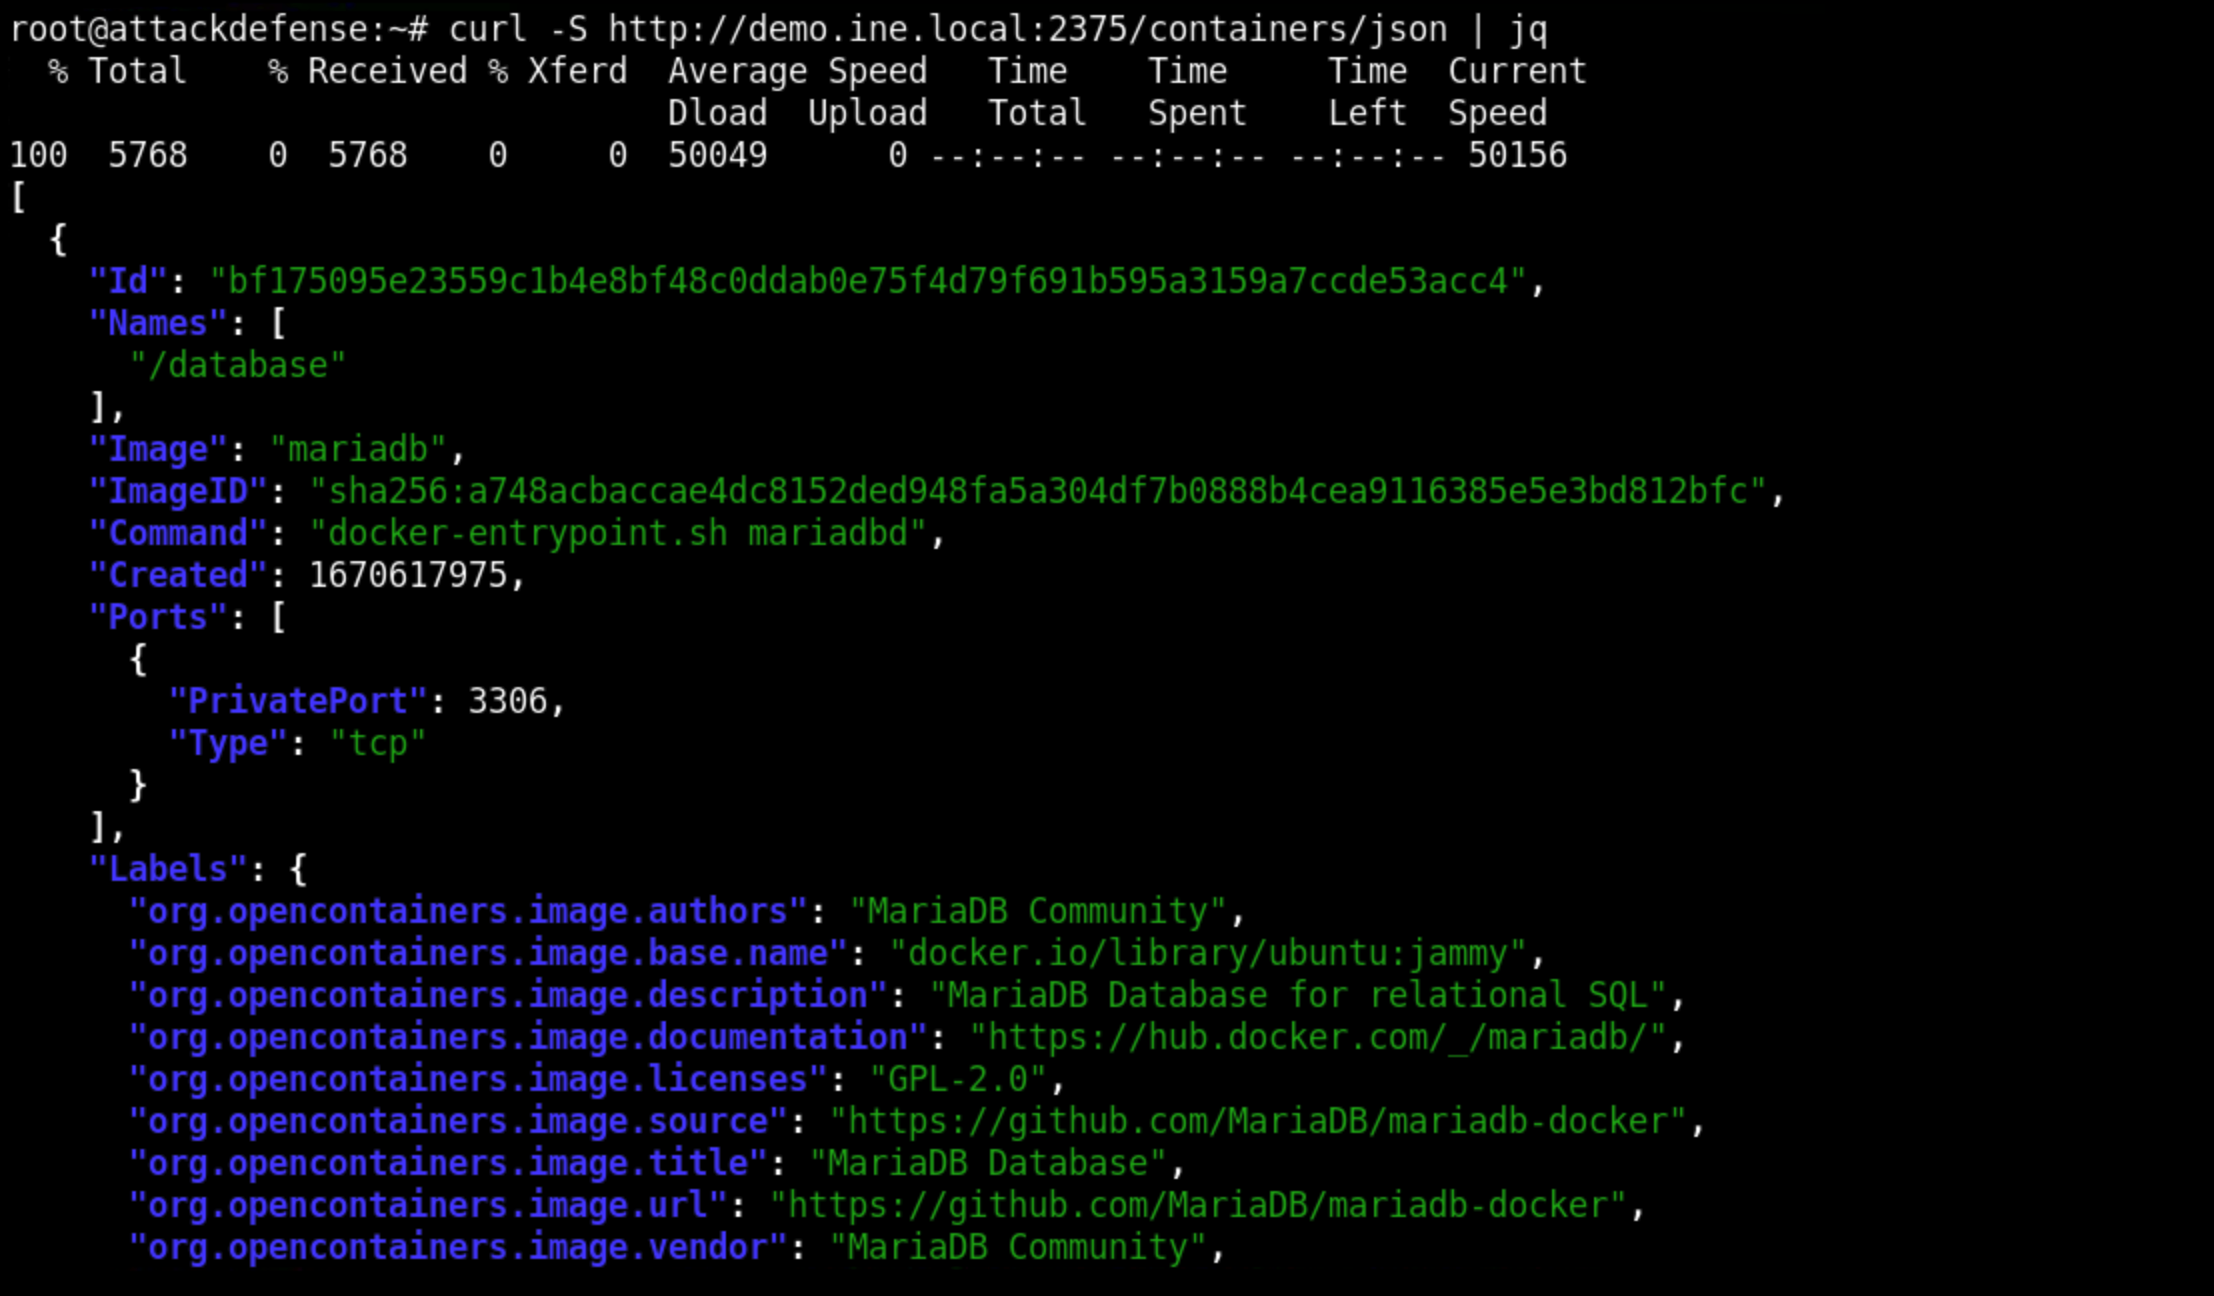
You can refer to the link below to check the list of APIs used to communicate with the Engine, so everything the Docker client can do can be done with the API remotely.
Reference: https://docs.docker.com/engine/api/version-history/
Let's try to fix this issue now on Target Machine.
Step 34: Check the service configuration file
The service configuration file is usually located at /lib/systemd/system/docker.service
Commands:
nano /lib/systemd/system/docker.service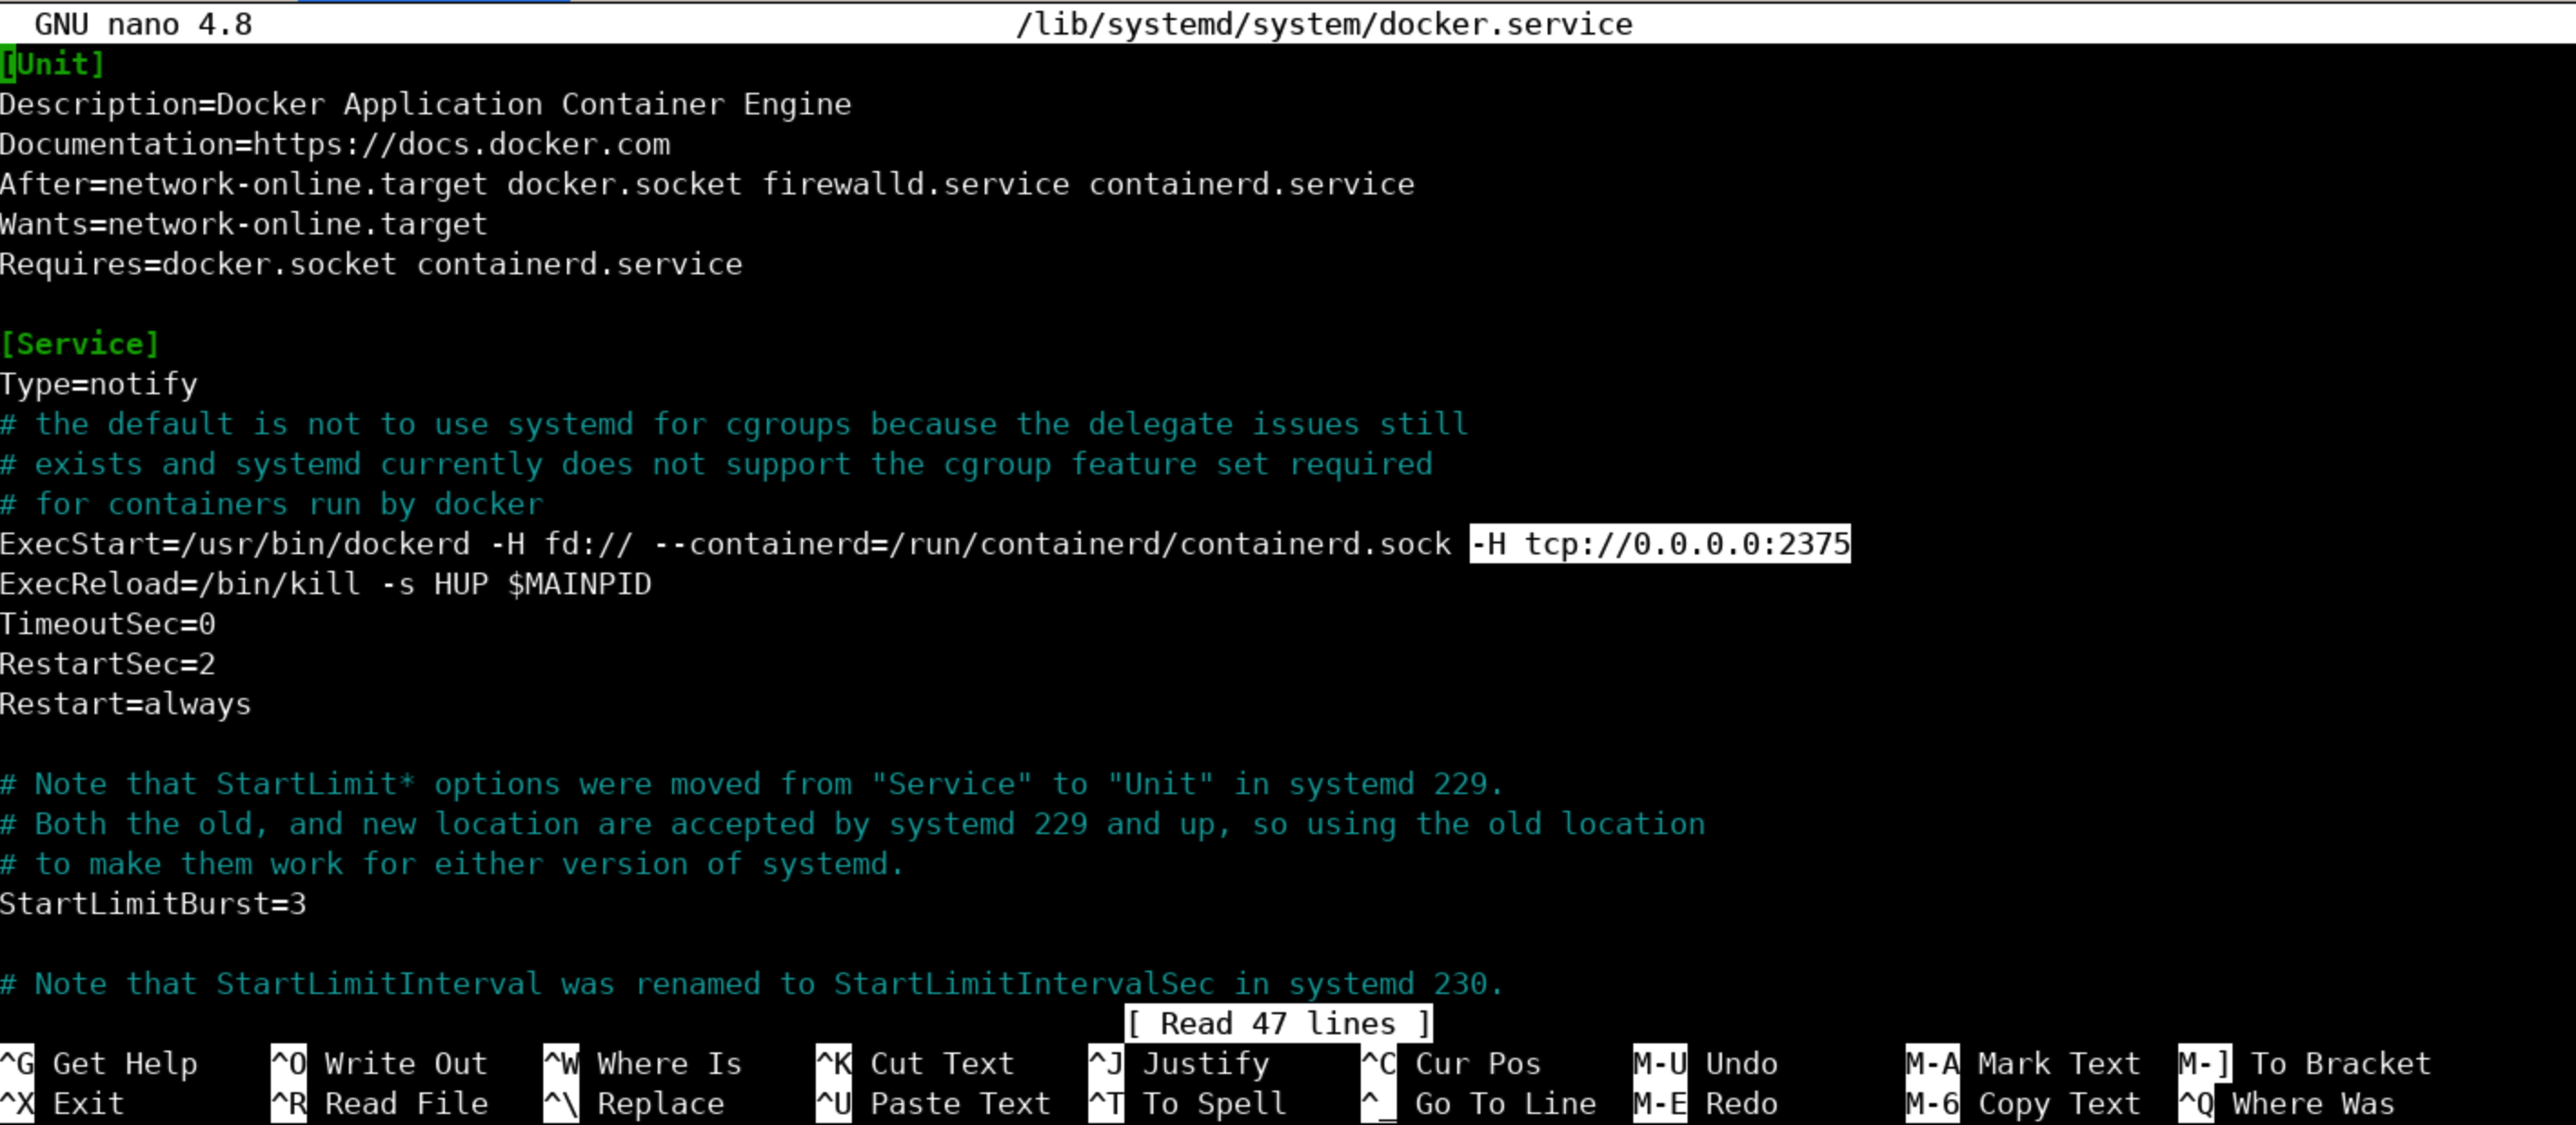
In the service configuration file, look for the ExecStart option, which specifies the command that is used to start the Docker daemon. This option should contain a -H flag that specifies the socket on which the Docker daemon will listen.
Step 35: Securing exposed daemon socket using the service configuration file.
Remove -H tcp://0.0.0.0:2375 from line 11, which starts from the ExecStart option.
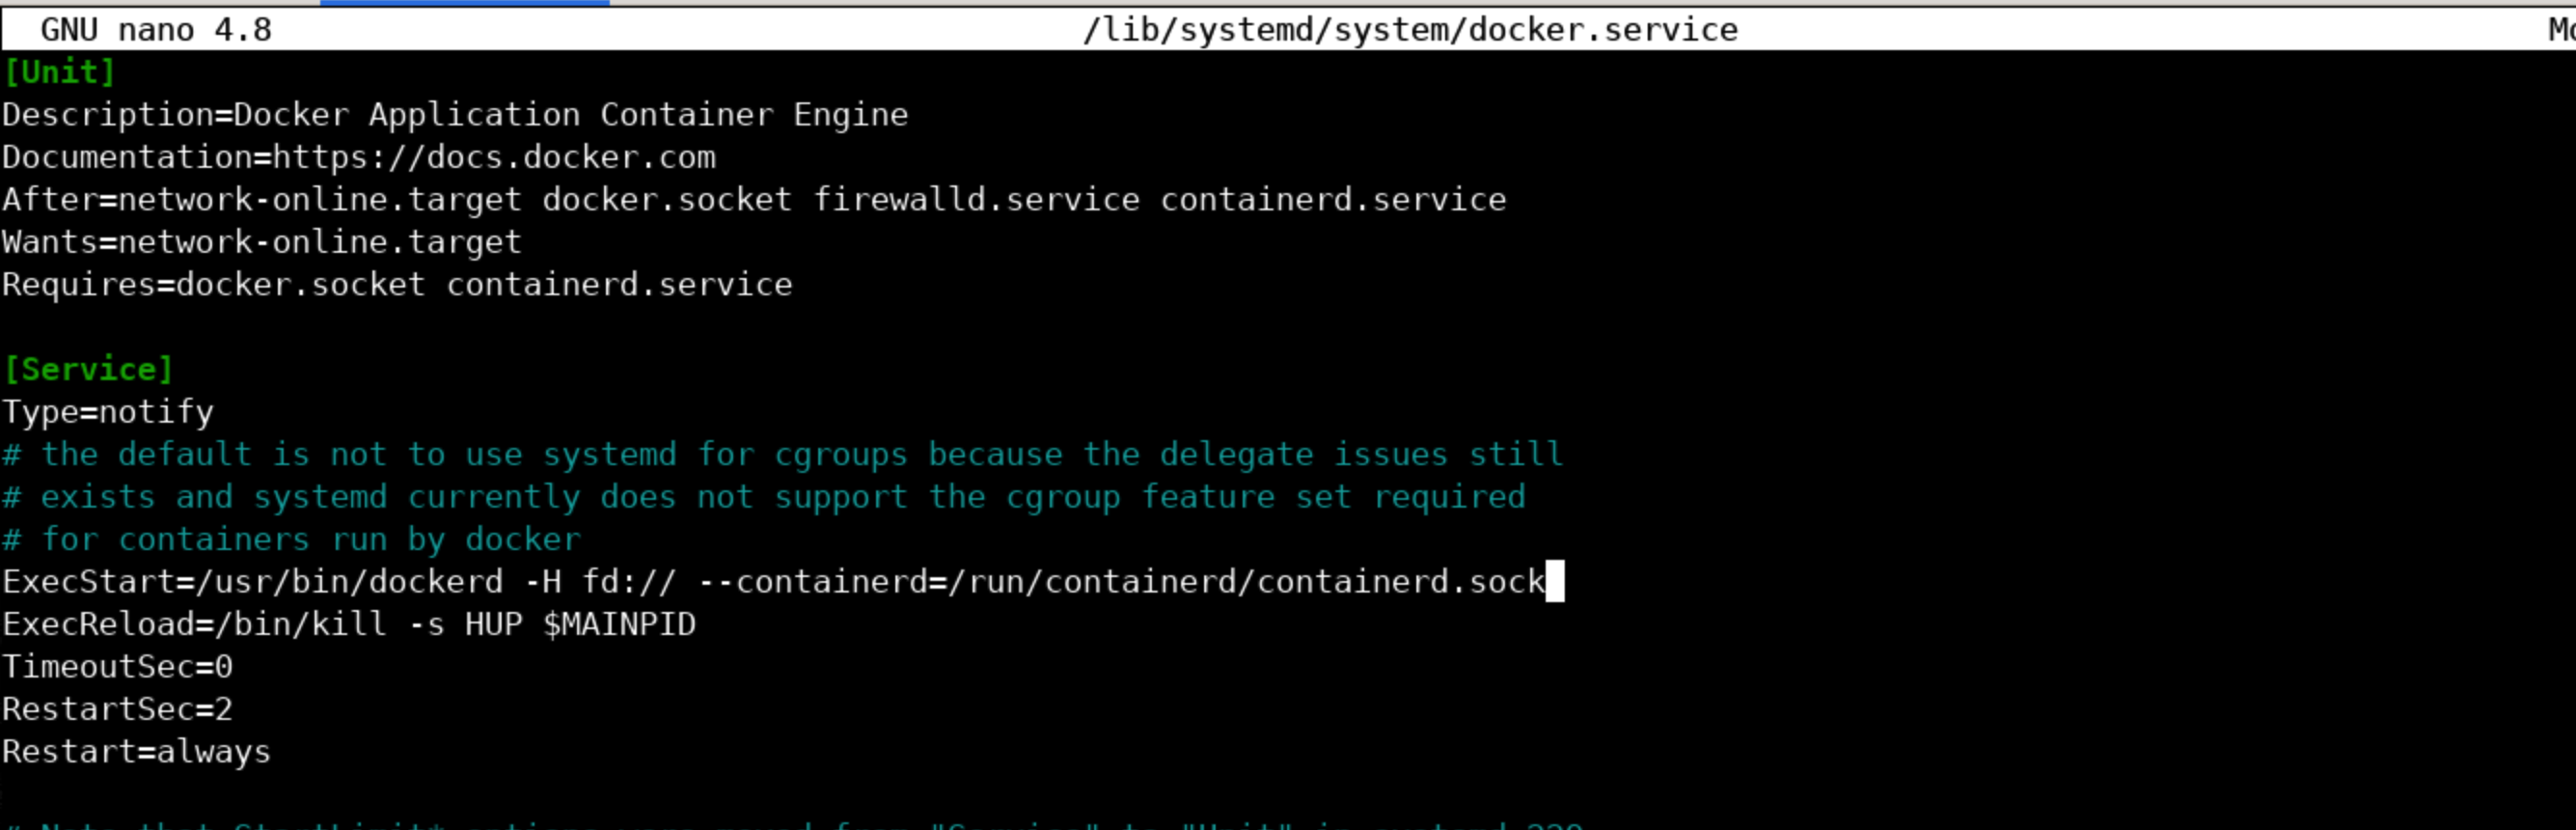
Save the file and restart the Docker service to apply the changes.
Step 36: Reload the docker daemon and restart the docker service
Commands:
systemctl daemon-reload
    systemctl restart docker
    systemctl restart docker.socket
This command retrieves the list of Docker images on the host from the Docker daemon API at http://0.0.0.0:2375/images/json. This API endpoint returns the list of Docker images in JSON format. JQ is used to parse and beautify the JSON.
Step 37: Validate the changes
Retrieve the list of Docker images on the host from the Docker daemon API at http://0.0.0.0:2375/images/json to check if the docker daemon socket is still exposed
Commands:
curl -S http://0.0.0.0:2375/images/json | jq
When the API request was made to the daemon socket, no results were found.
Step 38: Checking if Docker Daemon is showing up in netstat
Commands:
netstat -plunt | grep dockerd
Step 39: Check the changes on the Attacker's Machine
Although, the above steps are sufficient to determine that we have secured the exposed docker daemon socket. This shows that the remote connection to the target machine is also closed.
Commands:
curl -S http://demo.ine.local:2375/images/json | jq
Or you could just run Nmap on the target IP on the docker port and verify that the connection to port 2375 is also closed.
Hence, we can verify that we have secured the exposed docker daemon socket.
This is all for this lab. We successfully fixed the misconfigurations on the Docker server and secured it.
Reference: https://docs.docker.com/